Back to Basics with En Kanakku

Everyday I work on a megalith of a software called Open edX as a part of my work. It is built on top of Django. But here is the thing, it is very big piece of software and most of time I am tweaking something that is one among the many layers of abstraction and business logic.

This has created a deep desire to get down to the basics and build something. I tried learning Rust. A systems language. How more basic can I get than that? But what do I do with Rust? I don’t even know what kind of program I can write with that. A PDF Parser maybe? I downloaded the PDF 1.7 spec and started gathering 8 bits at a time. But Rust is not something that has the same velocity as Python or JavaScript. Understandably so. Compiled vs Interpreted.

In the meantime, something has also been really bothering me. My personal finance. Every year, I do a round up of my earnings and spends during the tax season and go over my savings. This year around, I have setup Firefly III to consume my bank statement and do it a little easier.

FireFly III is a fantastic software that made me realise a number of things I didn’t know about my finances

But…

I needed more. I have tasted something sweet and I need more. Here are the things I wanted Firefly to have to make life easier for me

  1. Native support for importing my bank statement. The Firefly Importer does its job, but I needed run an extra service for that and had to create a template for mapping the fields.
  2. Native support for importing PDF Credit Card statements. A lot of the details are being missed because all the expenses for a month are reported as a single entry in the bank statement – CC Payment.
  3. Automatic Categorisation of transactions. Firefly let us to set up static rules that can help do this, but I found it a little complex and I was always afraid one rule might override another and my categorisation would go for a toss.

So…

Why don’t I create a simple personal finance application in Python Django? I know the language and the framework. Creating something like this from scratch would allow me to get to the basics of Django. Get back to working with HTTP Responses, redirects, URL resolution, Middleware, Testing…etc., I use TDD and take help from ChatGPT to get the skeleton code.

I have also grown tired of the modern frontend development, the complexity is too much. This has helped me reset. Writing HTML in Django templates has been very cathartic. When I do need some interactivity, I plan on using HTMX. No Webpack, No bundling, None of the 1000 things that come with it.

I know, this doesn’t sound as sexy as “written in Rust”. But, working on this project has been very satisfying. It allows me to revisit things that I haven’t used in a long time. Build something I really want to use. And most importantly, takes me back to the basics – well at least to the basics of the abstraction layer Django provides.

The Project

The Project is named “En Kanakku” (என் கணக்கு) which is Tamil for “My Accounts”. Over the last couple of weeks, I have implemented:

  • Setup the dependencies and the basic skeleton for the app
  • Created a CSV Importer that can be subclassed to import transactions from any CSV file
  • Used it to create an importer for the Firefly III export
  • Added an admin action to merge account after the import

Now all of the transaction data I had in Firefly has been imported into En Kanakku, along with the accounts and categories. Baby steps…
Setting up my HomeServer – Part 3

I have so far written about:

and this post is about how I use Nomad to deploy software.

But before that…

I have some updates in the networking department. I had mentioned in Part 2 that, I use Nginx as a reverse proxy to route traffic from the internet into my public apps like Misskey.

By picking up the cues from Nemo’s setup, I experimented with Traefik and replace Nginx with Traefik. It was made easier by the fact that Traefik fully supports Nomad service discovery. That means, I don’t have to run something like Consul just to handle the service to Traefik Proxy mapping.

Running Traefik

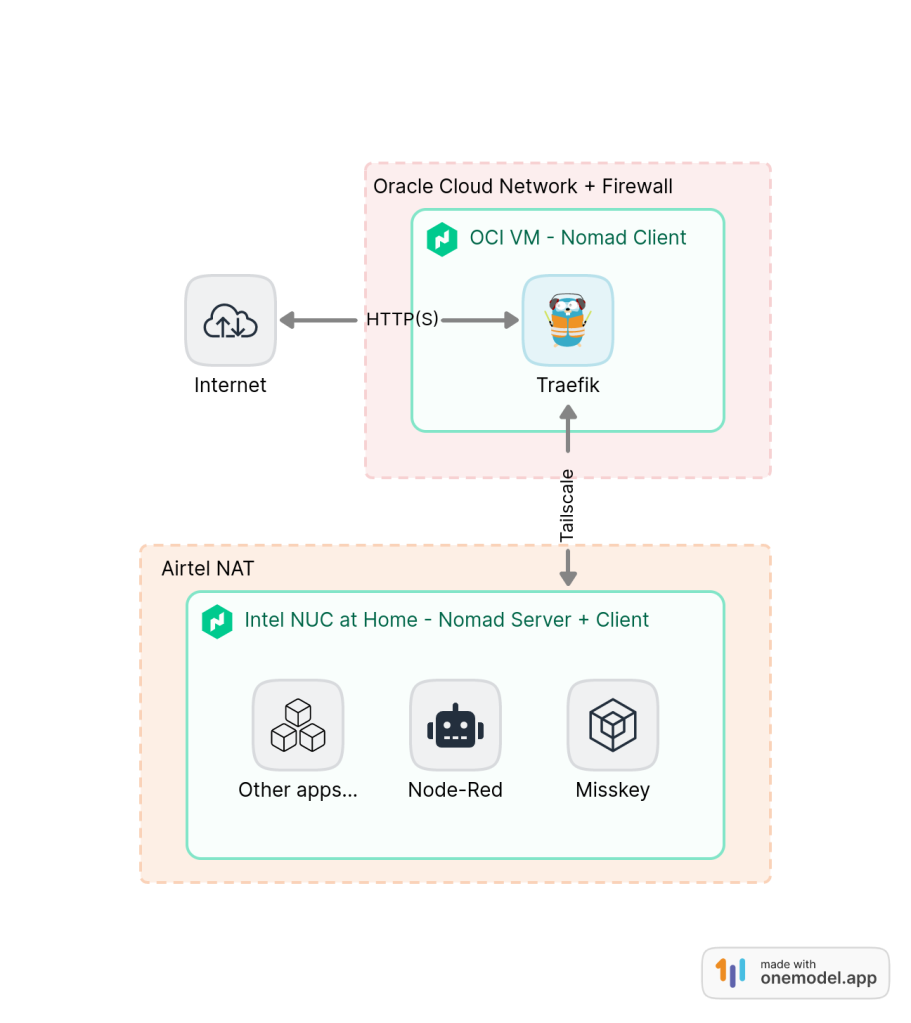
I was running Nginx as a Systemd service in the OCI virtual machine and Nomad was limited to running services in my Intel NUC. While moving to Traefik, I configured the OCI VM as a Nomad client and attached it to the Nomad “Cluster”. Since Nomad is running on the Tailscale network, I didn’t have to fiddle with any of the networking/firewall stuff in the OCI VM, making the setup simple.

Traefik is run as a Docker container in the VM with the “host” network mode so that it listens to the VM ports 80/443, which are open to the outside internet. I have specifically mapped the Traefik dashboard to the “tailscale” network, allowing me to access the dashboard via SSH tunneling without have to have the 8080 port open to the rest of the world.

// Nomad configuration

    network {
      port  "http" {
        static = 80
      }
      port "https" {
        static = 443
      }

      port "admin" {
        static = 8080
        host_network = "tailscale"
      }
    }

    task "server" {
      driver = "docker"
      config {
        image = "traefik:2.9"
        ports = ["admin", "http", "https"]
        network_mode = "host"
        volumes = [
          "local/traefik.toml:/etc/traefik/traefik.toml",
          "local/ssl/cert.pem:/etc/ssl/cert.pem",
          "local/ssl/private.key:/etc/ssl/private.key",
        ]
      }
    }

Deploying Applications

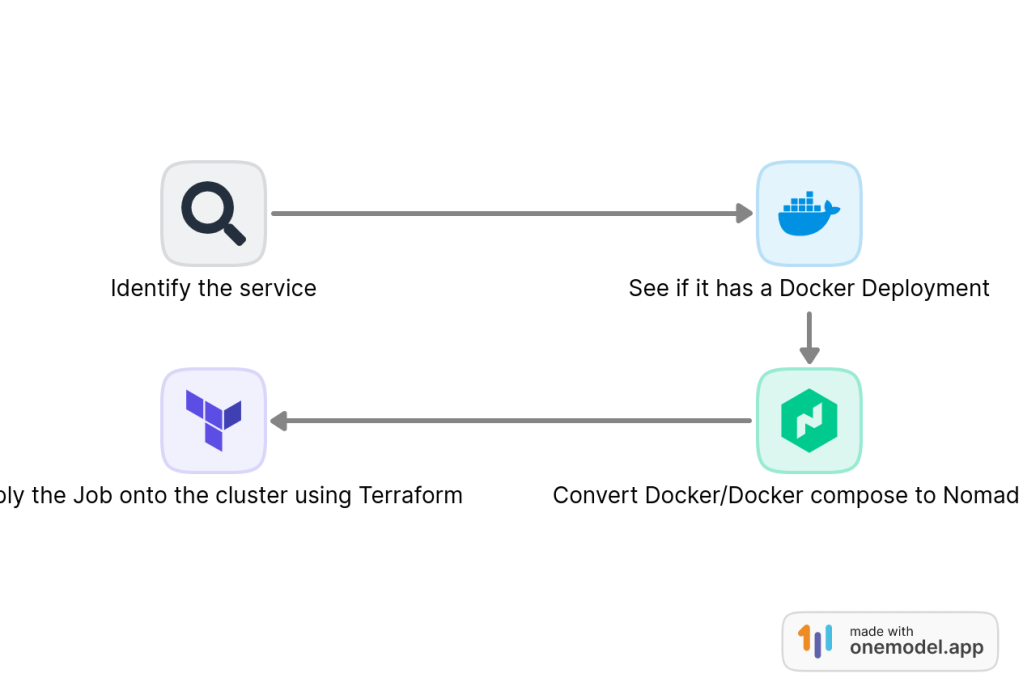
All the services are written as Nomad Job specifications, with a specific network config, and service definition. Then I deploy the software from my laptop to my homeserver by running Terraform.

Ideally, I should be creating the Oracle VM using Terraform as well. But the entire journey has been a series of trail and error experiments, that I haven’t done that. I think I will migrate to a Terrform defined/created VM once I figure out how to get Nomad installed and setup without manually SSHing into the VM.

Typical Setup Workflow

Since, most of what we are dealing with are web services, I haven’t run into a situation where I had to deal with a non-docker deployment yet. But I rest easy knowing that when the day comes, I can rely on the “exec” and “raw_exec” drivers of Nomad to run them using pretty much the same workflow.

Dealing with Secrets

One of the biggest concerns about all of this is dealing with secrets like, DB credentials, API Keys, ..etc., For example, how do I supply the DB Username and Password to the Nomad Job running my application without storing them in the Job configuration files which I have on version control?

There are many ways to do it, from defining them as Terraform variables and storing it as git-ignored file withing the repo to deploying Hashicorp Vault and using the Vault – Nomad integration (which I tried and found to be an overkill).

I have chosen the simpler solution of storing them as Nomad Variables. I create them by hand using the Nomad UI, and they are defined with specific task access.

An example set of secrets

These are then injected into the service’s container as environment variables using the template block with nomadVars.

// Nomad config for getting secrets from Nomad Variables

      template {
        data = <<EOH
{{ with nomadVar "nomad/jobs/owncloud/owncloud/owncloud" }}
OWNCLOUD_DB_NAME={{.db_name}}
OWNCLOUD_DB_USERNAME={{.db_username}}
OWNCLOUD_DB_PASSWORD={{.db_password}}
OWNCLOUD_ADMIN_USERNAME={{.admin_username}}
OWNCLOUD_ADMIN_PASSWORD={{.admin_password}}
{{ end }}

{{ range nomadService "db" }}
OWNCLOUD_DB_HOST={{.Address}}
{{ end }}

{{ range nomadService "redis" }}
OWNCLOUD_REDIS_HOST={{.Address}}
{{ end }}
EOH
        env = true
        destination = "local/env"
      }

Accessing Private Services

While this entire project began with trying to self host a Misskey instance as my personal Mastodon alternate, I have started using the setup to run some private services as well – like Node RED, that runs automation like my RSS-to-ActivityPub bots.

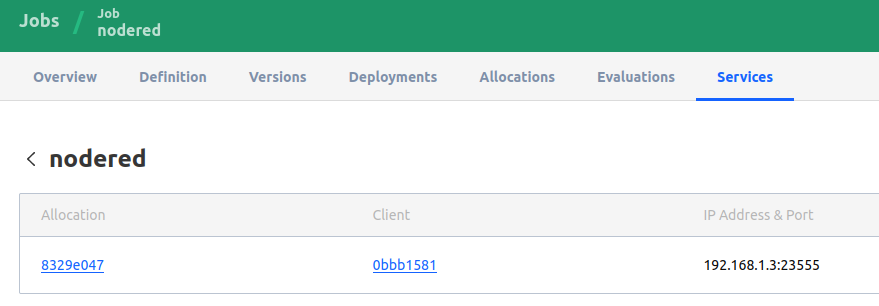
I don’t expose these to the internet, or even the Tailscale network at the moment. They are run on my home local network on a dynamic port assigned to by Nomad. I just access it through the IP:PORT generated by Nomad.

Node-RED running at local IP and Dynamic (random) port

I will probably migrate these to the Tailscale Network, if I start traveling and would still want to have access to them. But for now, they are just restricted to my home network.

Conclusion

It has been a wonderful journey figuring all of this out over the last couple of weeks and running the home-server has been a great source of satisfaction . With Docker and Nomad, it has been really easy to try out new services, and set them up quickly.

I woke up on a Sunday and wanted to setup Pihole for blocking ads. I had the house running via Pi-hole in 30 mins. I have found a new kind freedom with this setup. I see this as a small digital balcony garden on the internet.

References

  1. Understanding Networking in Nomad by Karan Sharma
  2. Translating Docker Compose & Kubernetes to Nomad by Luiz Aoqui
  3. Nomad Past Present and Future by Luiz Aoqui

Setting up my HomeServer – Part 2

In part 1, I wrote about the hardware, operating system and the software deployment method and tools used in my home server. In this one, I am going to cover one topic that I am least experienced in – Networking

Problem: Exposing the server to the internet

At the heart of it, this the only thing in Networking I really wanted to achieve. Ideally the following is all I should have needed:

  1. Login to my router
  2. Make the IP of my Intel NUC static, so that DHCP doesn’t assign a different value every time it reboots
  3. Setup port forwarding for 80 (HTTP) and 443 (HTTPS) in the router to the NUC.
  4. Use something like DuckDNS to update my domain records to point to my public address.

I did the first 3 steps, and tried to hit my IP. Nothing. After some searching on the internet, I came to realize that my ISP doesn’t provide Public IPs for home connections anymore and my router is under some NAT (don’t know what it is).

Before I outline how everything is setup, I want to highlight 2 people and their self-hosting related blogs:

  1. Abhay Rana aka Nemo’s Setup
  2. Karan Sharma’s setup

Their blogs provided a huge amount of inspiration and a number of ideas.

Solution: Tailscale + OCI Free VM

After asking around, I settled on using Tailscale and a free VM on Oracle Cloud Infrastructure to route the traffic from the internet to the VM.

Here is how Tailscale helps:

  1. All the devices that I install Tailscale in and login becomes a part of my private network.
  2. I added my Intel NUC and the Oracle VM to the Tailscale network and added the public IP of the Oracle VM to the DNS records of my domain.
  3. Now requests to my domain go to the OCI VM, which then get forwarded to my NUC via the Tailscale network.

Some Tips

  1. Tailscale has something called MagicDNS which once turned on allows accessing the devices using their name instead of their IPs. This allows configuring things quite easy.
  2. Oracle VM’s by default have all of their Ports Blocked except for 22 (SSH). So after installing the webserver like Nginx or Apache, 2 things need to be done:
    • Add Ingress Rules allowing traffic to ports 80 and 443 for the Virtual Cloud network that the VM is configured with
    • Configure the firewall to open the ports 80 and 443 (ufw allow <port>)

I think there are many ways to forward the requests from one machine to another (OCI Instance to Homeserver in this case). I have currently settled for the most familiar one – using Nginx as Reverse Proxy.

There are 2 types of applications I plan to host:

  1. Public applications like Misskey which are going to be accessed by anyone who wants to.
  2. Private applications like Node-RED which I am going to access 99.99% from my laptop connected to my home-network.

I deploy my public applications to the Tailscale Network IP in my homer server and make them listed to a specific port. Then, in the Nginx reverse-proxy configuration on the OCI VM, I set the proxy_pass to something like http://intel-nuc:<app-port>. Since I am using Tailscale’s magic DNS, I don’t have to hard-code IP values here.

For Private applications, I simply run them on the Intel NUC’s default local network, which is my router and other things connected to it (including my laptop) and access it locally.

Up next…

Now that the connectivity is sorted out, the next part is deploying the actual application and related services. I use Nomad to do that. In the next post I will share my “architecture” and how I use Nomad and Terraform to do deployments and some tricks I learnt using them.

Setting up my HomeServer – Part 1

Preamble

I had an old Intel NUC lying around that I always wanted to put it to good use. I had set it up as a home media server using Plex a couple years back, but streaming services and the newer content coupled with 100-300Mbps Fiber Internet connections have kind of made it redundant.

So, when finally a couple of weeks back when I wanted to switch from Twitter to Mastodon, I got the idea to just host an instance for myself. But Mastodon was in Ruby and I was at the time reading through the ActivityPub Protocol specifications to see if I can create an account using just a couple of scripts and a bunch of JSON files. I didn’t get far in the experiment, but someone ended up finding out Misskey. I setup a Misskey instance on Digital Ocean and set out to preparing the NUC for a home-server.

Hardware

The NUC I have has a Intel i3 processor with 4 cores each running at 2.1 GHz and has 16 GB of RAM and a 128 GB SSD. That’s the equivalent of an AWS EC2 Compute optimized c7g.2xlarge instance which costs about 0.289 USD/hour which comes to $200/month (approx).

Sidenote: I know its not apple to apple comparison between a hardware device and a cloud instance, but for my intended purposes, it totally works.

OS

I used to have this as an alternate desktop system, so it runs Ubuntu 22.04 Desktop Version with the default Gnome interface. I removed almost all the desktop software and left only the bare minimum necessary to run the OS and the desktop.

I thought about installing Ubuntu Server edition but couldn’t find a pendrive. So a stripped down desktop OS will have to do.

Software Deployment

Now this I am very particular about.

  1. I want to use Infrastructure as Code tools like Terraform as much as possible. This allows storing all the necessary configuration in a repo, so if and when my HDD fails, I can redeploy them again without having to do each and every one of them by hand again.
  2. I want to have some form of Web UI that can show the running services and resource consumption, if possible

First up is YUNOHost – It is an OS dedicated to self-hosting and supports a huge number of software and has a nice UI to manage them. But, the ones I want to host (Misskey) aren’t there and I don’t think storing config as code is an option here.

Next I looked at docker-compose – I am very familiar with it. The config can be stored as files and reused for redeployment. A lot of software are distributed with docker-compose files themselves. But, there is no web UI by default, and I also don’t want to run multiple copies of the same software.[1]

I have some experience with Kubernetes – There are lightweight alternatives like K3S, that might be suitable for a single node system. It fulfills the config-as-code and the Web UI requirements. But, the complexity is a bit daunting and the yaml can get a little unwieldy. And also everything needs to be in a container.

Finally I settled on Nomad – It seemed to have a fine balance.

  • It can handle docker containers, execute shell scripts, run Java programs..etc.,
  • The config is stored in JSON like HCL files, which feels better than the YAML
  • It has a web UI to see running services and resource utilization.

Footnotes

[1] – When software are distributed using docker-compose files, they tend to have all the necessary services defined in them. That usually means, along with the core software they also have other things like a database (Postgres/MariaDB), a web server (Nginx/Apache), a cache (Redis/Memcache)..etc., So, when multiple software are deployed with vendor supplied docker-compose files, it ends up running multiple copies of the same services using up unnecessary CPU and memory.

Personal Bookmarking using YACY & yacy-it

A recent post on HackerNews titled Ask HN: Does anybody still use bookmarking services? caught my attention. Specifically, the top response which mentioned a distributed Search Engine YACY.

The author of the post mentions how, he has configured it to be a standalone personal search engine. The workflow is something like this:

  1. Browse the web
  2. Come across an interesting link that you need to bookmark
  3. Add the URL to the YACY Crawler and crawl to the depth=0, which crawls just that page and indexes it.
  4. Next time you need it, just search for any word that might be present on the page.

This is brilliant, because, I don’t have to spend time putting it the right folder (like in browser bookmark) or tagging it with right keywords (as I do in Notion collections). The full text indexing takes care of this automatically.

But, I do have to spend time adding the URL to the YACY Crawler. The user actions are:

  • I have to open http://localhost:8090/CrawlStartSite.html
  • Copy the URL of the page I need to bookmark
  • Paste it in the Crawling page and start the crawler
  • Close the Tab.

Now, this is high friction. The mental load saved by not tagging a bookmark is easily eaten away by doing all of the above.

yacy-it

Since I like the YACY functionality so much, I decided I will reduce the friction by writing a Firefox Browser Extension – https://github.com/tecoholic/yacy-it

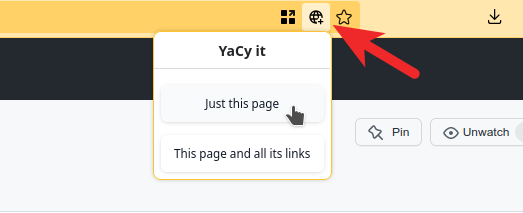
This extension uses the YACY API to start crawling of the current tab’s URL which I click the extension’s icon next to the address bar.

Note: If you notice error messages when using the addon, you might have to configure YaCy for CORS headers as described here https://github.com/tecoholic/yacy-it#configuring-yacy

Add pages to YaCy index directly from the address bar
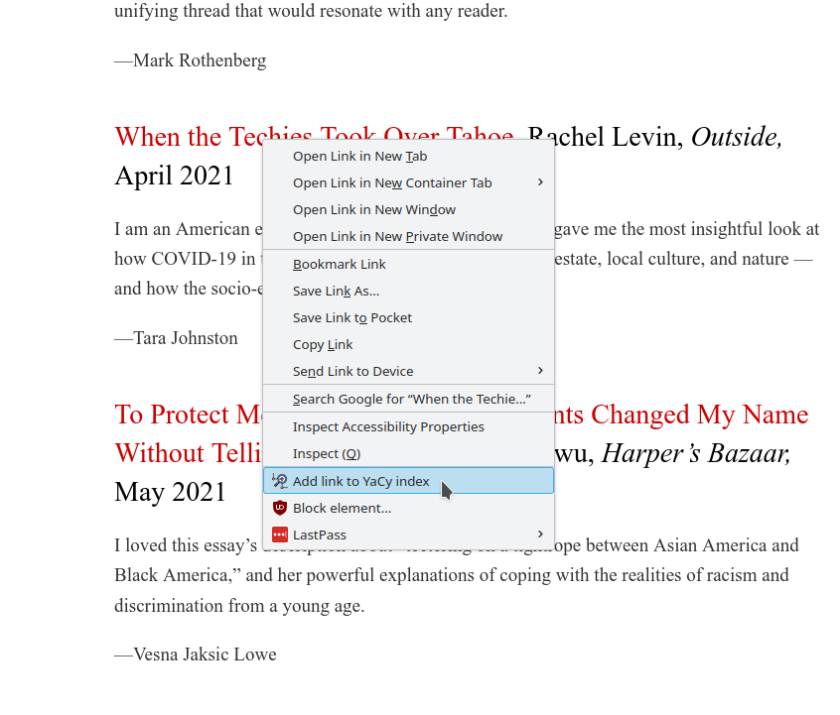
Right-click on a Link and add it to YaCy Index
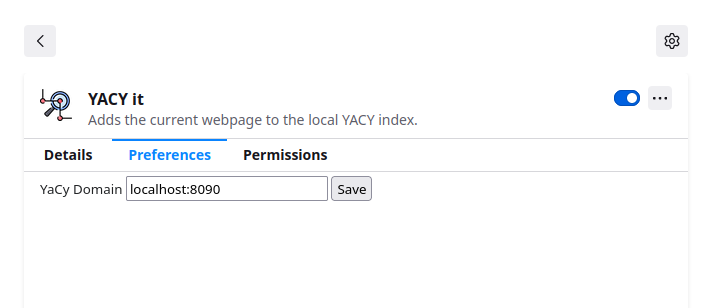
If you running YaCy on the cloud or in a different computer on the network, set it in the Extension Preferences

Tip – Search your bookmarks directly from the address bar

You can search through YaCy indexed links from your addressbar by added the YaCy as a search engine in Firefox as describe here => https://community.searchlab.eu/t/adding-yacy-to-firefox-search-menue/95

  1. Go to Setting/Preferences => Search and select “Add search bar in toolbar
  2. Now Go to the YaCy homepage at http://localhost:8090
  3. Click the “Lens” icon to open the list of search engines
  4. This should now show the YaCy icon with a tiny + icon. Click that to add it as a search engine.
  5. Go back to search settings and select “Use the address bar for search and navigation” to hide the search box
  6. Scroll down to Search shortcuts -> double click the Keyword column next to the Yacy and enter a keyword eg., @yacy or @bm
  7. Now you can search Yacy from the address bar like @yacy <keyword> or @bm <keyword> to look through your bookmarks.

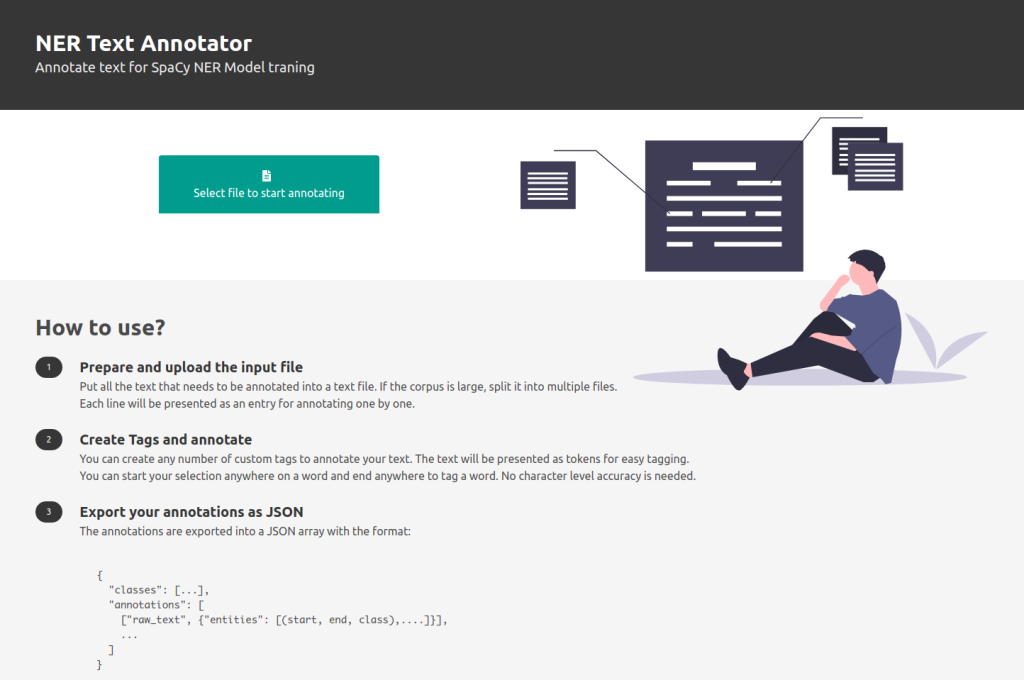
NER Annotator / NER Tagger for Spacy

NER Annotator is now available to use directly from the browser

https://tecoholic.github.io/ner-annotator/

Background

As with most things, this started with a problem. Dr. K. Mathan is an Epidemiologist tracking Covid-19. He wanted to automated extraction of details from government bulletins for data collection. It was a tedious manual process of reading the bulletins and entering the data by hand. Since the bulletins has paragraphs of text with text in them, I was looking to see if I can leverage any NLP (Natural Language Processing) tools to automate parts of it.

Named Entity Recognition

The search led to the discovery of Named Entity Recognition (NER) using spaCy and the simplicity of code required to tag the information and automate the extraction. It kind of blew away my worries of doing Parts of Speech (POS) tagging and then custom writing an extraction algorithm. So, copied some text from Tamil Nadu Government Covid Bulletins and set out test out the effectiveness of the solution. It worked pretty well for the small amount of training data (3 lines) vs extracted data (26 lines).

Trying out NER based extraction in Google Colab Notebook using spaCy

But it had one serious issue. Generating Training Data. Generating training data for NER Annotation is a pain. It is infact the most difficult task in the entire process. The library is so simple and friendly to use, it is generating the training data that is difficult.

Creating NER Annotator

NER Annotation is fairly a common use case and there are multiple tagging software available for that purpose. But the problem is they are either paid, too complex to setup, requires you to create an account or signup, and sometimes doesn’t generate the output in spaCy’s format. The one that seemed dead simple was Manivannan Murugavel’s spacy-ner-annotator. That’s what I used for generating test data for the above example. But it is kind of buggy, the indices were out of place and I had to manually change a number of them before I could successfully use it.

After a painfully long weekend, I decided, it is time to just build one of my own. Manivannan’s tagger just uses JavaScript to create the training data JSON and then requires a conversion using a Python Script before it can be used. I decided to make it a little more bug proof.

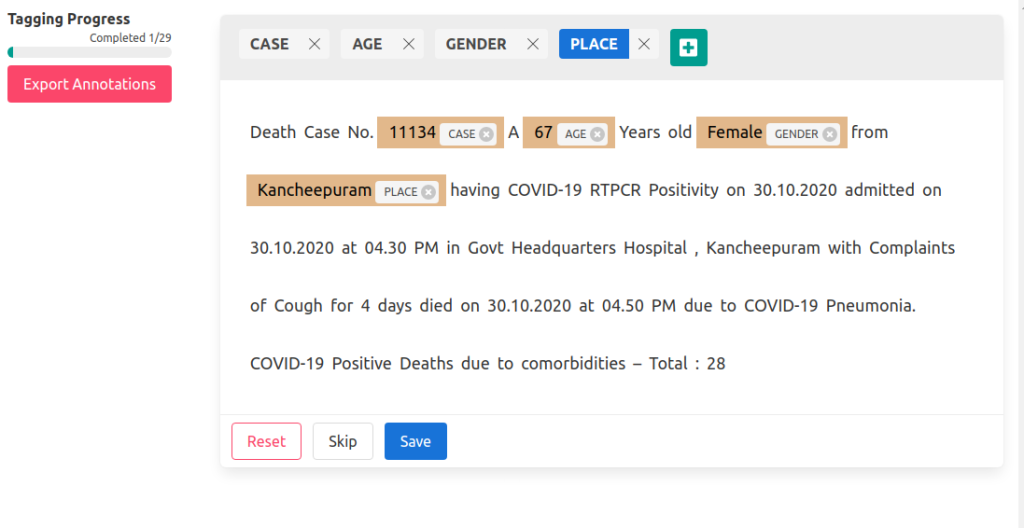
This version of NER Annotator would:

  1. Use a Python backend to tokenize and detokenize text for tagging and generating training data.
  2. The UI will let me select tokens (idea copied from Prodigy from the spaCy team), so I don’t have to be pixel perfect in my selections.
  3. Generate JSON which can be directly loaded instead of having to post-process it with Python script.

The Project

I created the NER with the above goals as a Free and Open Source project and released it under MIT License.

Github Link: https://github.com/tecoholic/ner-annotator

Credits

Thanks to Philip Vollet noticing it and sharing it on LinkedIn and Twitter, the project has gotten about 107 stars on Github and 14 forks, which is much more reach than I hoped for.

Thanks to @1littlecoder for making a YouTube video of the tool and showing the full process of tagging some text, training data and performing extractions.

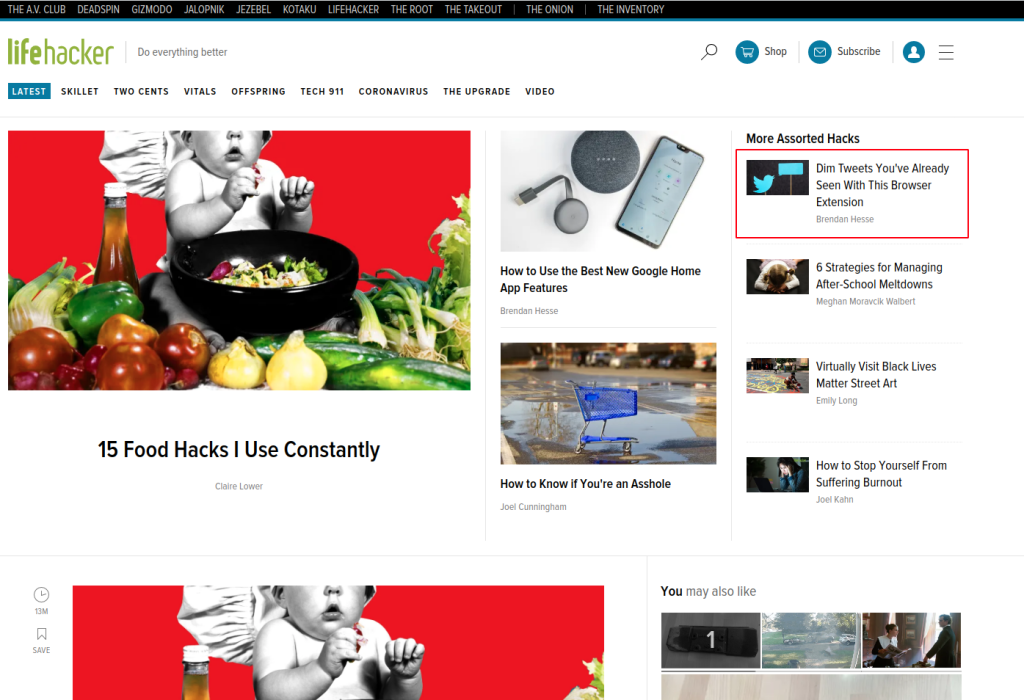
Featured on TheNextWeb & Lifehacker

Something really cool happened this week. I will let the tweets to take over.

… and that’s how I made it to the homepage of TheNextWeb.

… and Lifehacker

Source code of the extension: https://github.com/tecoholic/Just-Arrived

For Chrome: Chrome Webstore

For Firefox: https://addons.mozilla.org/en-GB/firefox/addon/just-arrived-ff/

What did I learn from this?

The most important thing I learnt while doing this is probably the fact that the extension architecture is standardised across Chrome and Firefox. Thanks to Shrinivasan for asking me to port it to Firefox.

But, I think the relationship is one sided. Firefox can work with extensions written for Chrome, but Chrome won’t work with extensions written for Firefox. This is due to the nature of Firefox’s API and the fallback it offers.

For example, the storage api on Firefox is storage.* whereas on Chrome it is chrome.storage.*. Since Firefox has fallbacks for all the chrome.* API, the code primarily written for Chrome works without modifications on Firefox. But if a developer writes the plugin first for Firefox, it would lose the namespacing and therefore won’t work.

More technical details here at MDN web docs: Building a cross-browser extension

Special thanks @tshrinivasan for pushing me to build it for Firefox to @SuryaCEG for the UX advised and @IndianIdle for writing the article.

Building a quick and dirty data collection app with React, Google Sheets and AWS S3

Covid-19 has created a number of challenges for the society that people are trying to solve with the tools they have. One such challenge was to create an app for data collection from volunteers for food supply requirements for their communities.

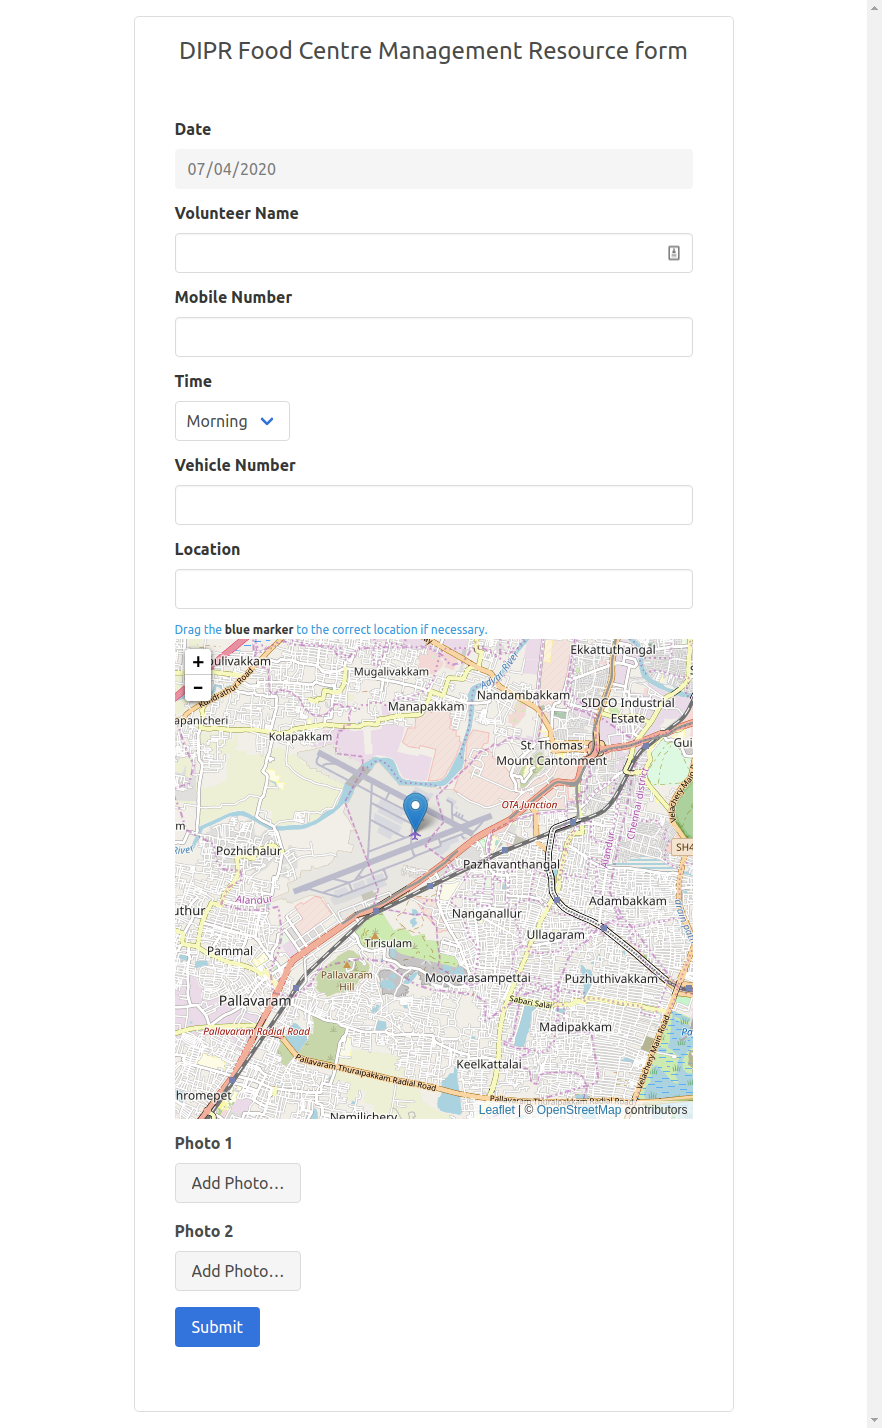
This needed a form with the following inputs:

  1. Some text inputs like the volunteer’s name, his vehicle number, address of delivery..etc.,
  2. The location in geographic coordinates so that the delivery person can launch google maps and drive to the place
  3. A couple of photos of the closest landmark and the building of delivery.

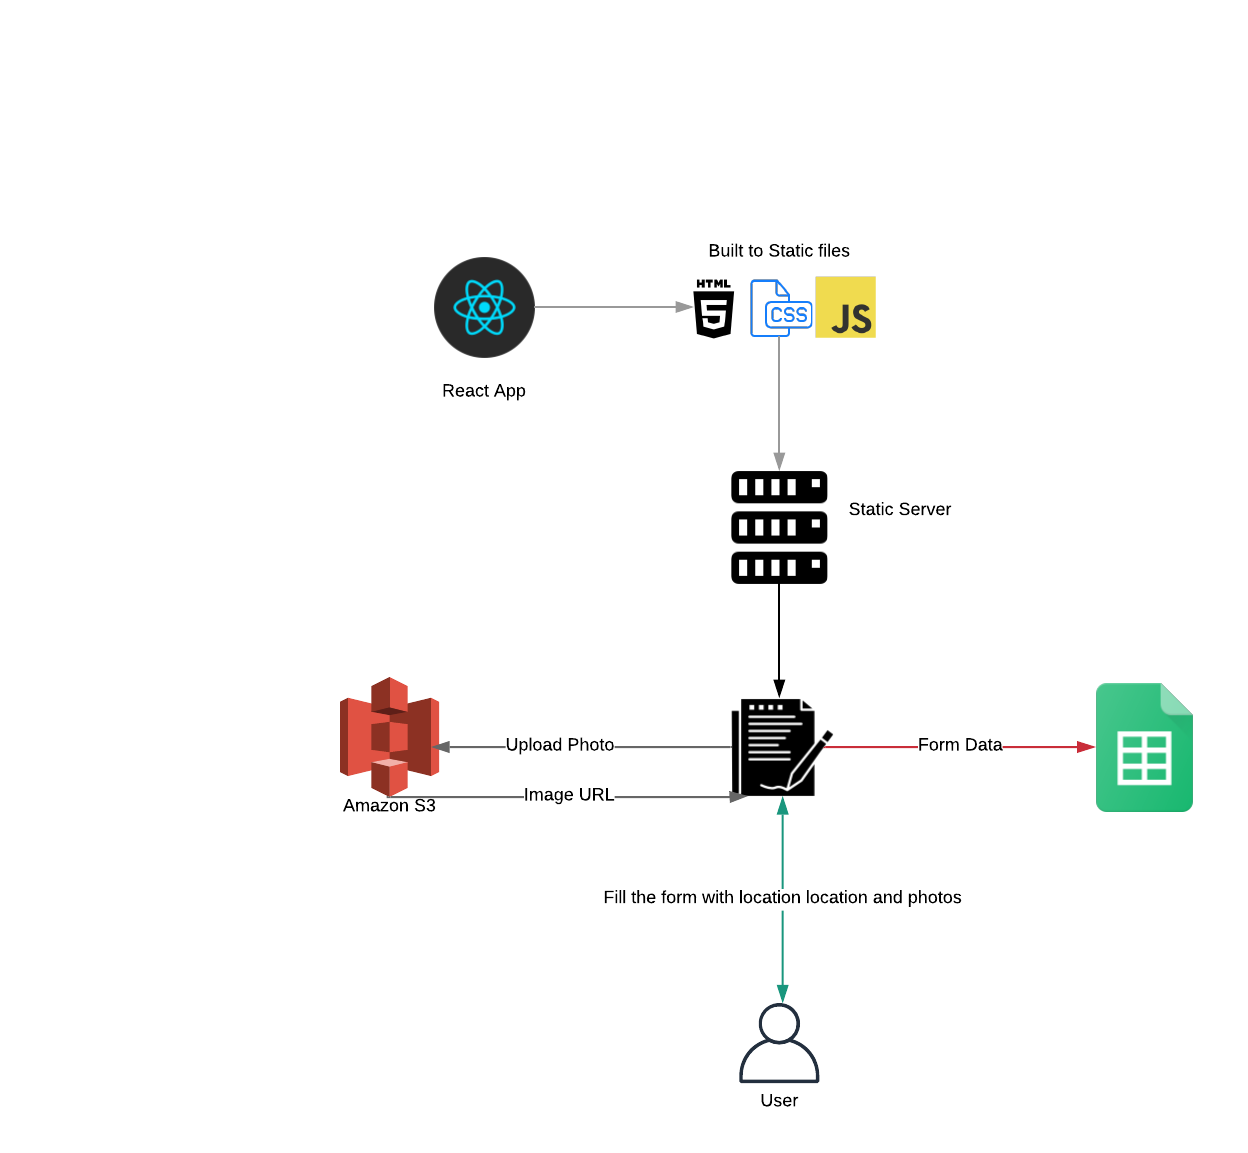
Multiple ready made solutions like Google Forms, Zoho Forms were attempted, but we hit a block when it came to having a map widget which would let the location to be picked manually, and uploading photos. After an insightful experience with CovidCrowd, we were no longer in a mood to build a CRUD app with Database, servers..etc., So the hunt for low to zero maintenance solution resulted in a collection of pieces that work together like an app.

Piece 1: Google Script Triggers

Someone has successfully converted a Google Sheet into a writable database (sort of) with some Google Script magic. This allows any form to be submitted to the Google Sheet and the information would be stored in the columns like in a Database. This solved two issues, no need to have a database or a back-end interface to access the data.

Piece 2: AWS S3 Uploads from Browser

The AWS JavaScript SDK allows direct upload of files into buckets from the browser using the Congnito Credentials and Pool ID. Now we can upload the images to the S3 bucket and send the URLs of the images to the Google Sheet.

Piece 3: HTML 5 Geolocation API and Leaflet JS

Almost 100% of this data collection is going to happen via a mobile phone, to we have a high chance of getting the location directly from the browser using the browser’s native Geolocation API. In a scenario where the device location is not available or user has denied location access, A LeafletJS widget is embedded in the form with a marker which the user can move to the right location manually. This is also sent to the Google Sheets as a Google Maps URL with the Lat-Long.

Piece 4: Tying it all together – React

All of this was tied together into a React app using React hook form with data validation and custom logic which orchestras the location, file upload ..etc., When the app it built it results in a index.html file and a bunch of static CSS and JS files which can be hosted freely as Github Pages or in an existing server as a subdirectory. Maybe even server over a CDN gzipped files, because there is nothing to be done on the server side.

We even added things like image preview in the form so the user can see the photos he is uploading on the form.

resource_form

Architecture Diagram

resource_form_architecture

Caveats

  1. Google Script Trigger Limits – There is a limit to how many times the Google Script can be triggered
  2. AWS Pool ID exposed – The Pool ID of with write capabilities is exposed to the world. If there is someone smart enough and your S3 bucket could become their free storage or if you have enabled DELETE access, then lose your data as well.
  3. DDOS and Spam – There are also other considerations like Spamming by watching the Google Script trigger or DDOS by triggering with random requests to the Google Script URL that you exhaust the limits.

All of these are overlooked for now as the volunteers involved are trusted and the URL is not publicly shared. Moreover the entire lifetime of this app might be just a couple of weeks. For now this zero maintenance architecture allows us to collect custom data the we want.

Conclusion

Building this solution showed me how problems can be solved without having to write a CRUD app with a admin dashboard every time. Sometimes a Google Sheet might be all that we need.

Source Code: https://github.com/tecoholic/ResourceForm

PS Do you know Covid19India.org is just a single Google Sheet and a collection of static files on Github Pages? It servers 150,000 to 300,000 visitors at any given time.

NiftyBot

The Mastodon ecosystem is really nice. The concept of Fediverse bringing in decentralized social network is a breath of fresh air. I created NiftyBot account in botsin.space – a dedicated server for Mastodon Bots.

What is NiftyBot?

  • It is a Mastodon Bot Account

What does it do?

  • It posts updates about Indian Markets
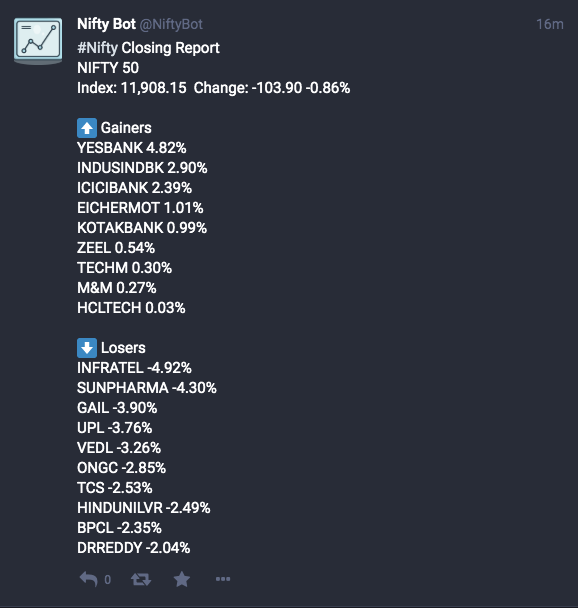
  • Currently it posts NSE closing report at 4.01 PM everyday. Sample post below

niftybot-sample

How does it work?

It is a Python script running in AWS Lambda.

lambda-niftybot

A scheduler tiggers the Lambda Function at 4.01 every Monday – Friday. The lambda function is a Python Script that fetches the necessary details from NSE’s output data and posts to Mastodon.

Source Code:

https://gist.github.com/tecoholic/ca4f9933335b34388375bceb213a5801.js

Some asked about if this bot is open source. Obviously, you see the source right here. 🙂 Still I will add the license here.

The above source code is released into the Public Domain. You can do what ever you want with it.

How much does it cost to run this Bot?

Nothing.

Numbers Please:

The AWS Lambda Free tier comes with 1 Million requests and 400,000 GBSec, which is a combination of how much memory we use and the time taken by our process. Since I have used the CloudWatch Scheduler Event as the trigger, I am using 20-22 requests, the Python function takes about 60 MB to run so running at the lowest memory of 128MB block, and usually completes in around 2600-2700 msec. The metrics says my worst billed event so far is about 0.3375 GBSec. With about 20-22 trading days in a month, I might use a total of 8-10 GBSeconds, leaving enough room to run many more bots like this one 🙂

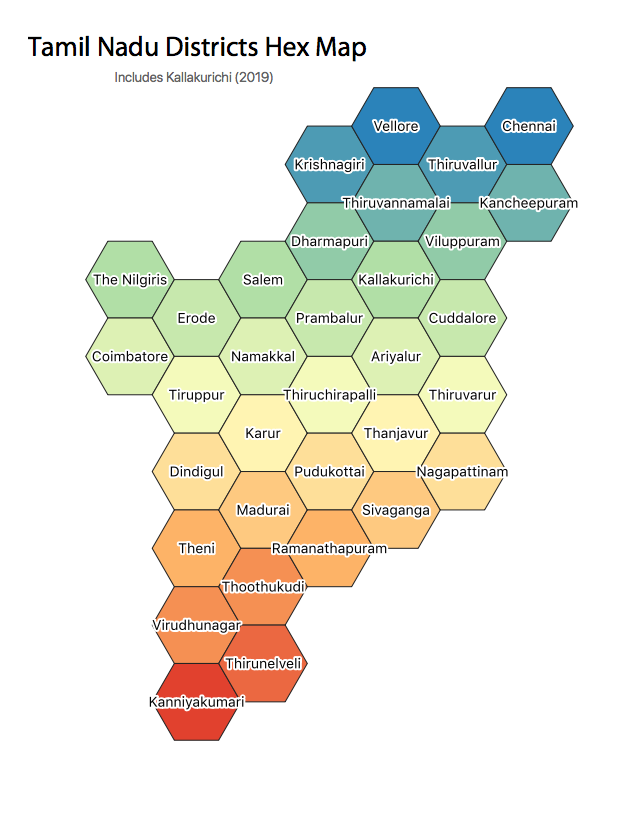
Districts of Tamil Nadu – Hexagonal Maps

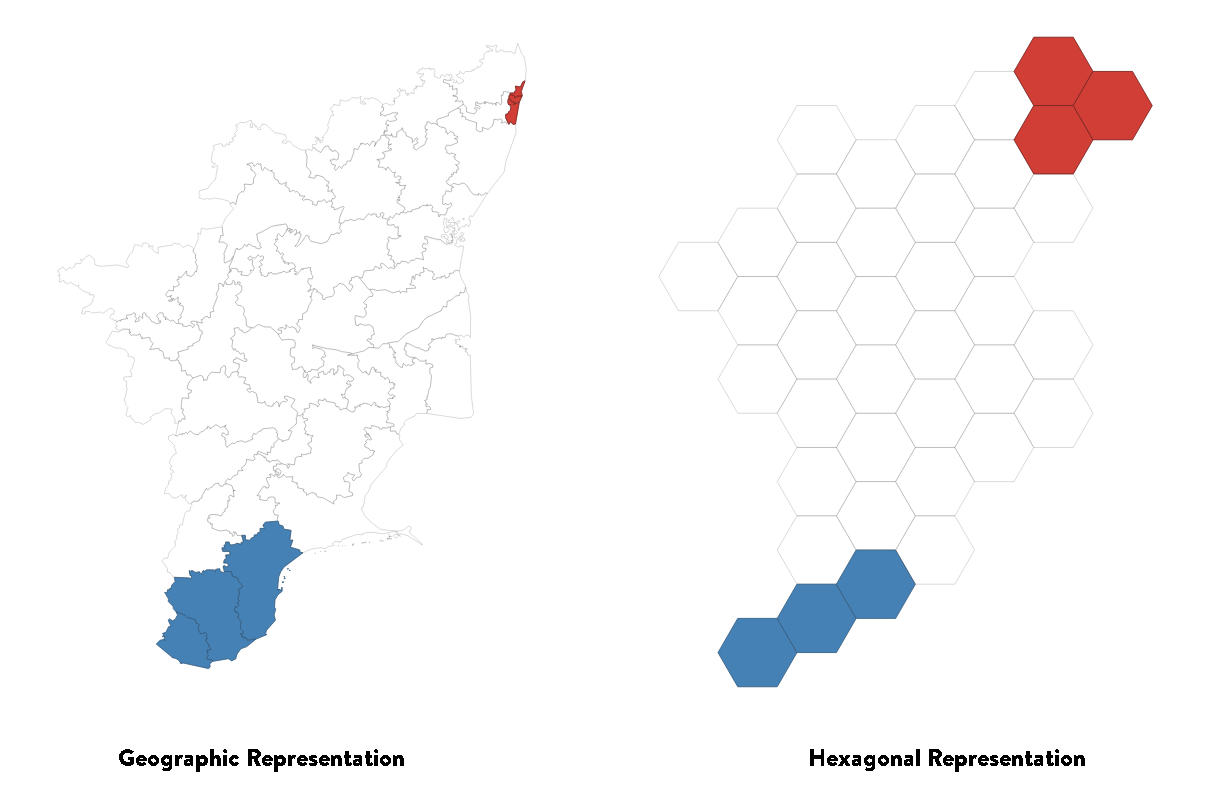
Hexagonal maps are useful for creating data visualisations of data points that are a representation of quantities that require equal sized polygons. For example Election Maps. While geographic map of the assembly and parliamentary constituencies might be used for visualising election results, it is a false one. The constituencies are created based on the number of people in a region under the principal of a representative for every X number of people. In such a scenario, using a geographic representation for a place like Chennai, which is made of 3 parliamentary constituencies, doesn’t give us the same perception as the 3 constituencies Kanniyakumari, Thoothukudi, and Thirunelveli put together. But in reality that’s what it actually means.

hex_comparison

  • Geographic Representation – Skewed representation of the base data. Unequal real estate for equal (approx) number of people
  • Hexagonal Representation – Correct representation of the base data. Equal real estate for equal number of people.

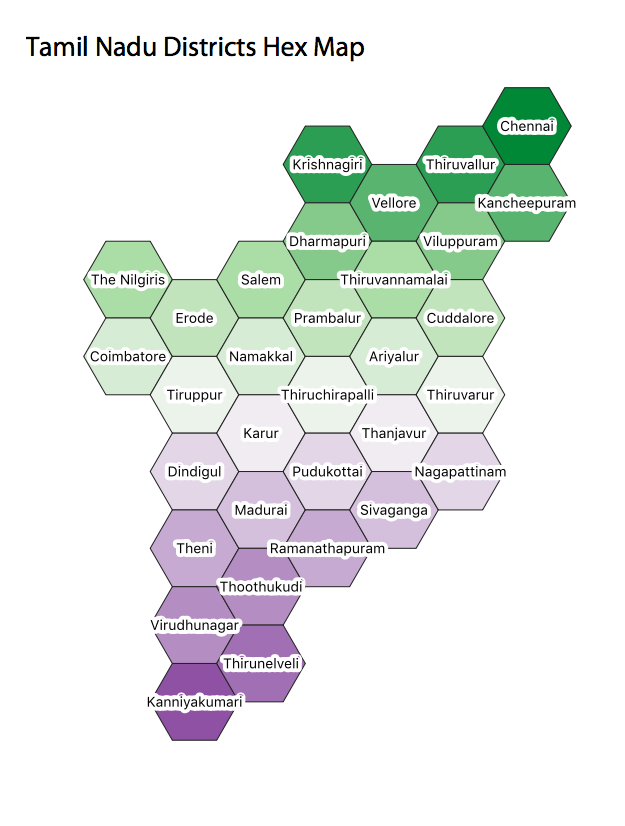
Now that we have the Parliamentary constituencies in Hex Map form, why not have the Districts as well.

TN_hexTN_2019

If you need the base data to create your own maps. The GeoJSON files for the same are available here https://github.com/tecoholic/Geographic-Data