Clean Python compiled files (.pyc) using py3clean

Recently ran into some issues with Python compiled files __pycache__ and *.pyc files not getting deleted when doing git checkout. The files have been created when I mounted the folder as a volume in a docker container and had different rights than the current user. So, I needed to use sudo to remove them recursively in the project.

That’s when I learnt of this cool new tool called py3clean. Simply run py3clean <folder> and it will remove all the Python compiled files recursively.

Learning Rust – Day 1

Dev notes from learning Rust.

Official Website: https://www.rust-lang.org

Notes

  • Rust is a compiled language – different from my daily drivers Python and JavaScript both interpreted languages.
  • Compiled means re-learning the difference between passing by reference and passing by value
  • Rust has mutability at the core of data management – so being conscious about immutable and mutable data
  • Errors are handled as a part of the Result of functions. Doesn’t need an explicit try...except (at least at this point)
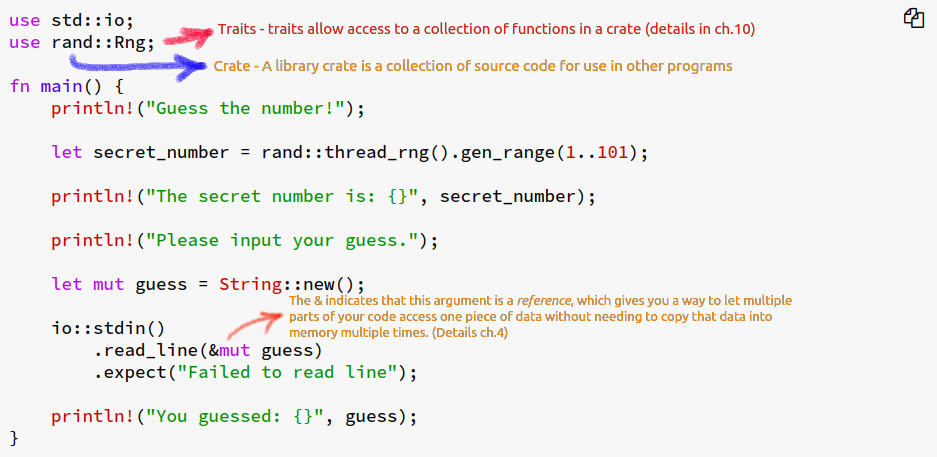
  • Packages are called crates and there are binary crates & library crates
  • https://crates.io/ is the package registry
  • Cargo.lock file acts as the record of dependencies for Reproducible builds
  • cargo update updates the packages to the most recent bugfix version
  • there is something called Traits which provide access to functions of a crate.

Backup all the files in a directory to Azure Cloud

I had to copy all the files from the home directory into a Azure Blob container today. All the regular folders without any of the dot files and dot folders.

Azure CLI provides batch upload functionality to upload folders. But there are two issues I faced:

  1. I needed to copy all the folders – and I didn’t want to run the command for each folder.
  2. I wanted to preserve the folder structure in the container as well.

After some trial and error I settled on this one liner.

for f in */; do az storage blob upload-batch -d container-name/$f -s $f; done;

For loop take care of #1 and using the /$f takes care of creating corresponding folders to preserve the same folder structure as in my home directory.

This assumes you already have set the AZURE_STORAGE_ACCOUNT and the AZURE_STORAGE_KEY environment variables for authentication.

Strapi – Optimizing REST API responses by preventing auto-population of relations

Strapi is an Open Source headless CMS based on NodeJS. It provides the backend admin tools to quickly create an API – both REST and GraphQL.

This is a mini series which outlines:

  1. Setting up Strapi and creating an API
  2. Adding ownership control to the API endpoints
  3. Optimising REST API responses – (you are here)

So far …

We have created a REST API for an expense management application with category support. We have JWT token based auth which came with Strapi to authenticate users. We have implemented the IsOwner policy in the controllers to restrict data access.

Optimizing the Responses while

The API by default automatically populates relationships and sends in all the related data. It is very useful for some cases and completely a overkill for others. Take the following for example.

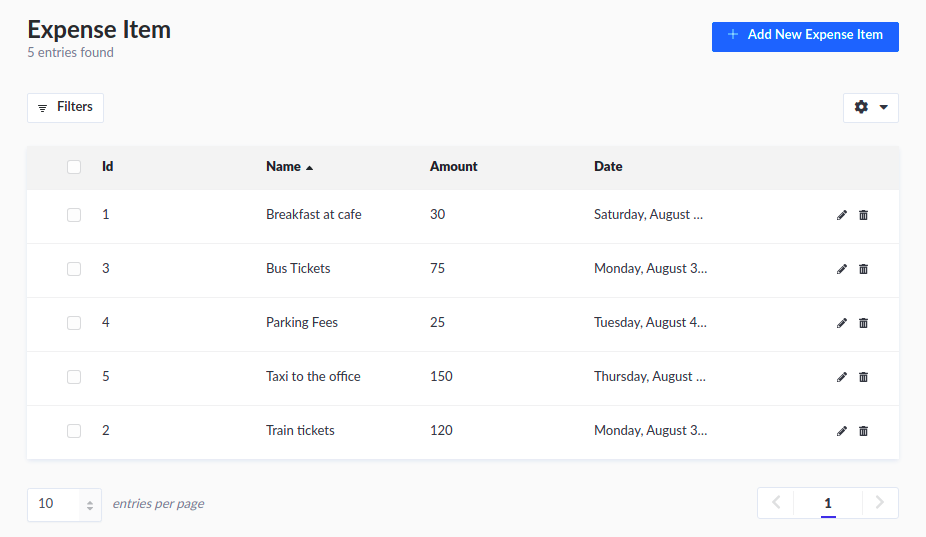
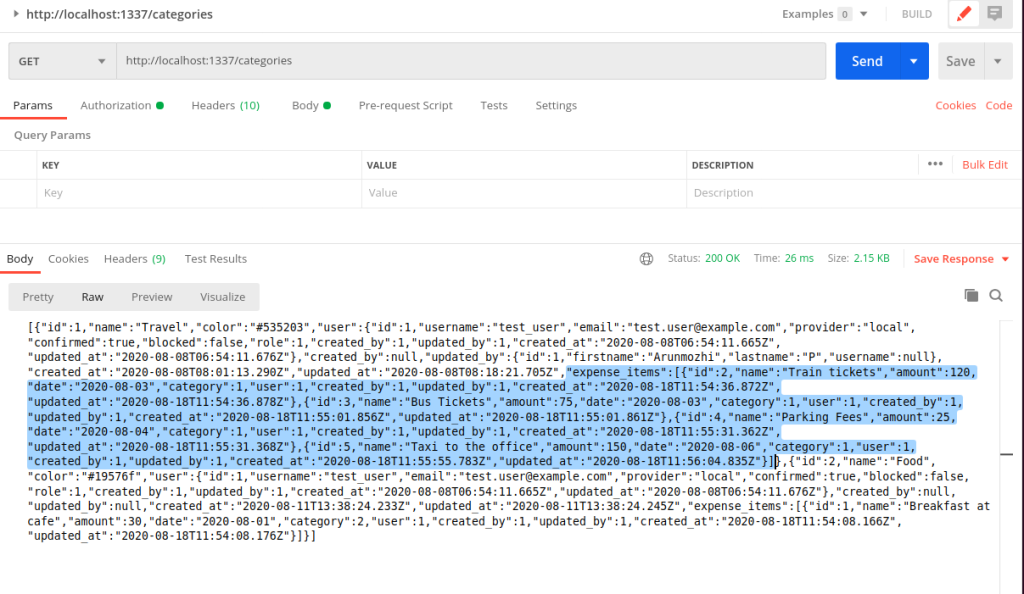
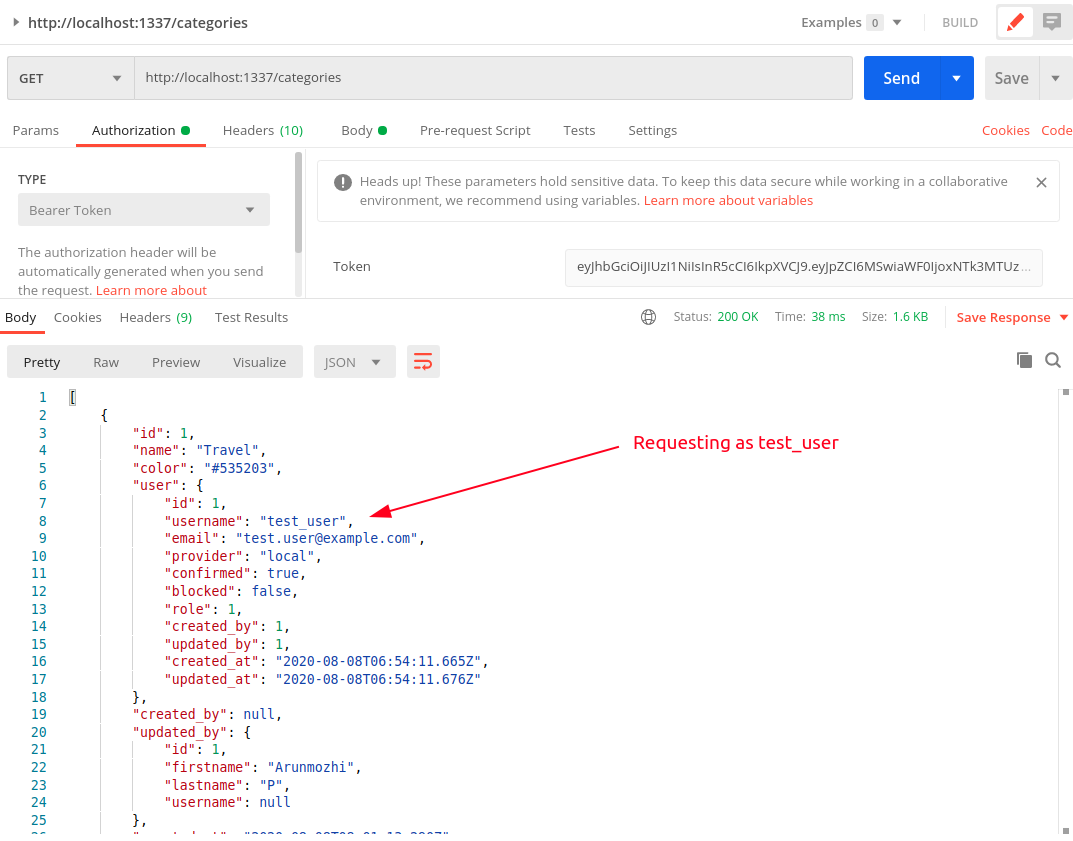
I have setup 5 Expense Items in the Admin dashboard for our test_user. 4 of them are under the category ‘Travel’ and one of them is under the category ‘Food’. Now when we fetch the categories, let us see what we get.

When making a GET request to /categories, we are not only getting the categories but also all the expense items which are under every category. When a user has thousands of expense items, we cannot be querying the DB for all of them whenever a GET request is made to categories. That would cause serious performance issues.

Preventing auto-population of relations

We can turn this off by setting the autoPopulate flag to false in the model.

  • Open the file /api/category/models/category.settings.json
  • Add the line "autoPopulate": false in the the expense-items block as shown below
  • Let us also disable auto-population of the user. We have already implemented the IsOwner policy for all requests, so only the owner is going to be requesting their own categories and the user field is redundant data.
{
  "kind": "collectionType",
  "collectionName": "categories",
  "info": {
    "name": "Category"
  },
  "options": {
    "increments": true,
    "timestamps": true
  },
  "attributes": {
    "name": {
      "type": "string",
      "required": true,
      "minLength": 2
    },
    "color": {
      "type": "string"
    },
    "user": {
      "plugin": "users-permissions",
      "model": "user",
      "via": "categories",
      "autoPopulate": false
    },
    "expense_items": {
      "via": "category",
      "collection": "expense-item",
      "autoPopulate": false
    }
  }
}

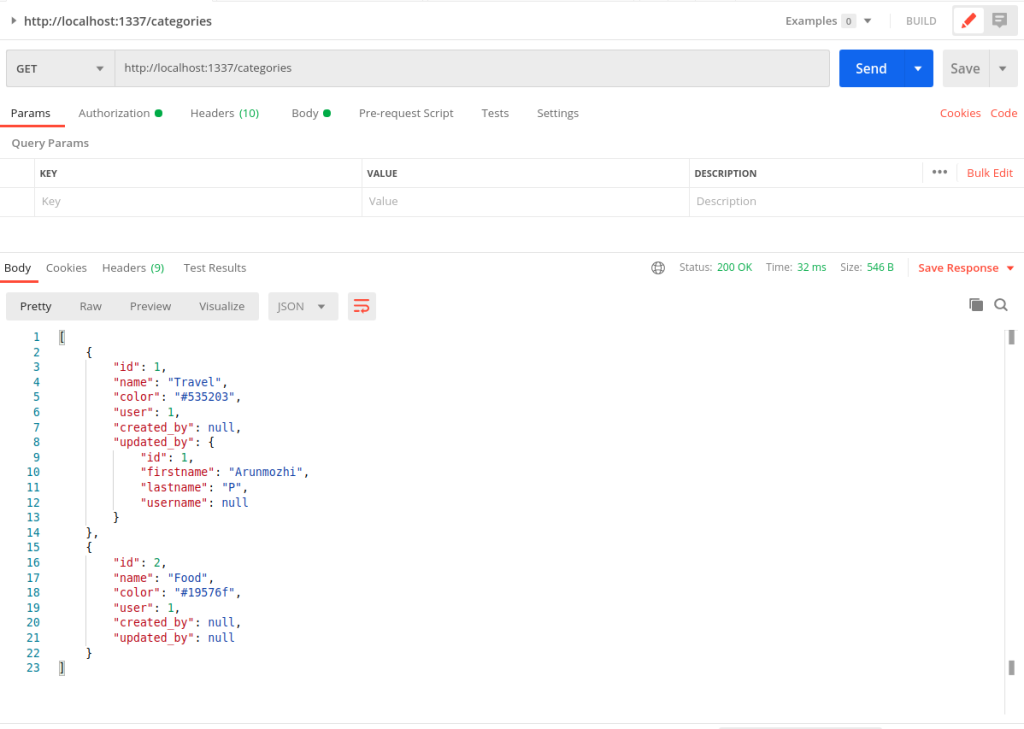
Now as soon as we save the file, the Strapi dev server should restart. Now we can run the same GET /categories request to verify the results.

There is no expense items in the response. Just the categories.

We can use this method to turn of auto population of any relation in any of the Content Types we have created. This way the API returns only what we intend it to return.

Optimising the Login response

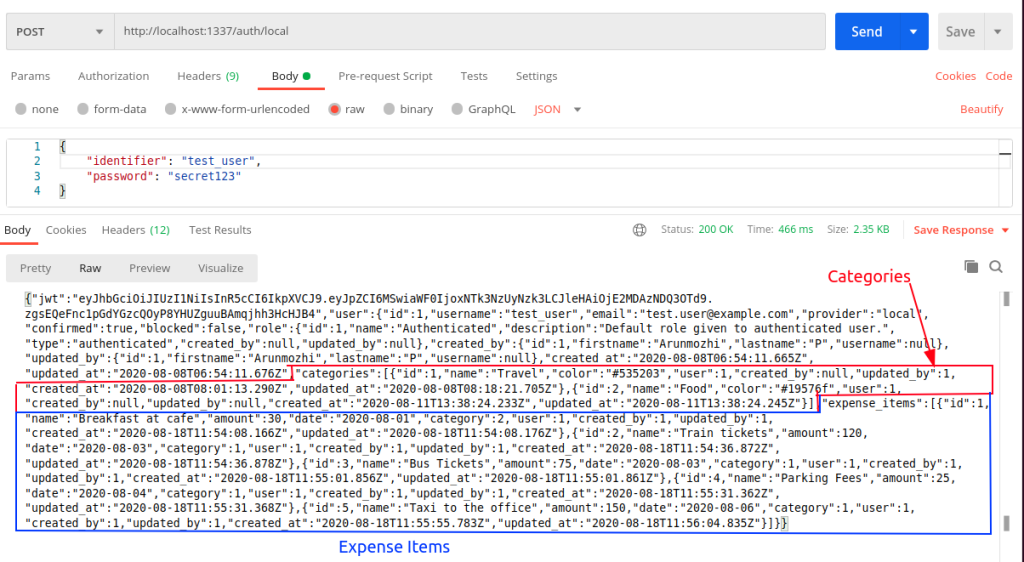
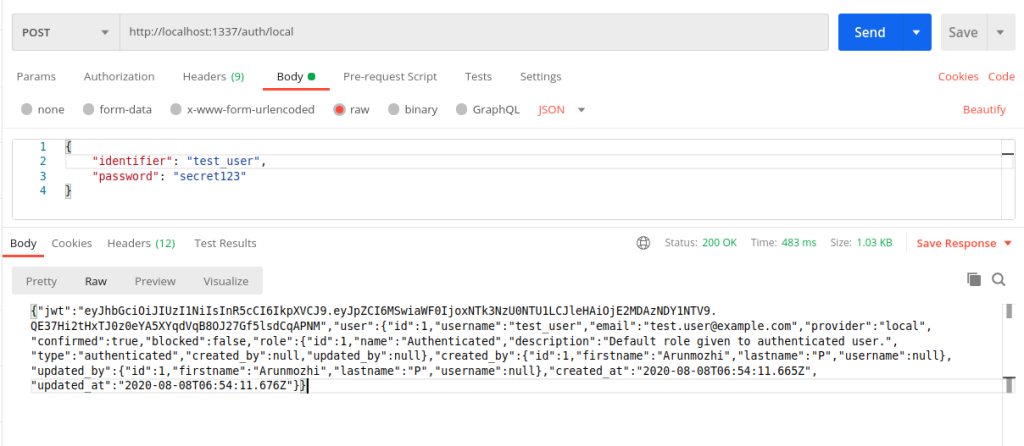
Let us take a look at the login response.

We can see that it contains all the categories and expense items of the user. This would put disastrous load on the system as the data size grows. So, let us turn off auto-populate for the users as well.

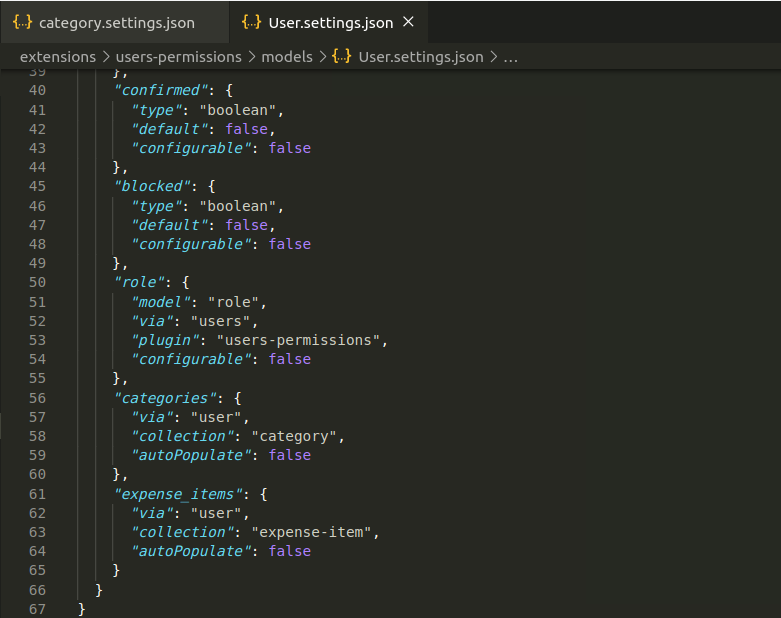
  • Open /extensions/user-permissions/models/User.settings.json
  • Scroll to the bottom and add "autoPopulate": false to the entries categories and expense_items

Now, let us login again and check the response.

No categories or expense items in the response, just the JWT token user object and the roles. Now every time a user logs in Strapi won’t be querying the database for everything related to the user.

Conclusion

This concludes this mini series. By applying the changes presented in this series, Strapi can be used a REST API backend not just for CMS purposes with strong public frontend, but also as a good backend for User focused web applications.

In my journey as a web developer, Strapi blew my mind the same way Django did almost a decade back with its built-in Admin UI. The amount of power Strapi packs right off the box is amazing.

Strapi – Adding IsOwner Policy to the API

Strapi is an Open Source headless CMS based on NodeJS. It provides the backend admin tools to quickly create an API – both REST and GraphQL.

This is a mini series which outlines:

  1. Setting up Strapi and creating an API
  2. Adding ownership control to the API endpoints – (you are here)
  3. Optimising REST API responses

So far…

We have created models for the app and have an API setup which works with JWT Authentication without a single line of code. But we have an issue, any authenticated user can read every other user’s data.

This can be rectified using setting up an access policy in the Model’s controller file.

Side Note: Strapi’s Policies section explains how to implement them and configure them for routes here. But that doesn’t work for IsOwner policy because ownership is object specific and thus has to be implemented in the controller instead of policy configuration.

Writing the Is Owner Policy

We will be using the Create is owner policy document as our reference material to update our API. I will be repeating all of it here with a little more information.

We have two models defined so far – Category & ExpenseItem. I am going to implement the IsOwner policy for Category and leave ExpenseItem as an exercise. Now, let’s go write some code.

  • Let us open our text editor and open the api/category/controllers/category.js file
  • It should have the following content
'use strict';

/**
* Read the documentation (https://strapi.io/documentation/v3.x/concepts/controllers.html#core-controllers)
* to customize this controller
*/

module.exports = {};

All of our code will go into the braces. We will be adding 6 functions:

  1. create – the function executed when a new category is created. Here we will make sure that any newly created category is automatically assigned to the user creating the category.
  2. find – the function execute when all the objects are listed. For eg., /categories. When a user requests categories, we will filter the results such that the user receives only their’s and not others’.
  3. findOne – Same as the one above when a single object is accessed with id like /categories/1
  4. count – the count of objects in a model. We will be counting only the objects created by a particular user
  5. update – update a specific object. Only the owner should be able to do it
  6. delete – delete a specific object. Only the owner should be able to delete an object.

The above will cover the 4 CRUD operations and the 2 extra ones (listing and counting).

Create function

const { parseMultipartData, sanitizeEntity } = require("strapi-utils");

module.exports = {
/**
* Create a new Category
*
* @param {*} ctx The Request Context
*/
async create(ctx) {
let entity;

if (ctx.is('multipart')) {
const { data, files } = parseMultipartData(ctx);
data.user = ctx.state.user.id;
entity = await strapi.services.category.create(data, { files });
} else {
ctx.request.body.user = ctx.state.user.id;
entity = await strapi.services.category.create(ctx.request.body);
}
return sanitizeEntity(entity, { model: strapi.models.category });
},
};

Strapi is built on Koa.js and thus uses async await instead of callbacks. Let us break down the logic of the function and see what’s happening.

  • the function is passed in the Request context which has the all the request related information like the form data, the user identified in the request (from our JWT token)..etc.,
  • we check if it is a multipart form which would mean we have uploaded files to deal with.
  • we parse the form for data and files, set the user as the user executing the request and use the Strapi service for our model to create a new entity.
  • if it is not a multipart form, then we just set the user of the request as an extra field into the request data and create the category using the Strapi service
  • finally we need to return the new category as a response – We use strapi’s function sanitizeEntity to pass in the newly created entity and the model.

Side Note: I know the Category model doesn’t have any files attached to it and the IF block with ‘multipart’ check is not necessary in this situation. But I am leaving it here for two reasons:

  1. If in the future, we want to support logos or some form of header image for the Category model, we don’t have to come back and update the code again.
  2. This might act as a reference implementation for someone reading the blog and might use it on a model with files and don’t want them to wonder files are not getting saved.

If you really want to have a lean code base then the just 3 lines would be sufficient

module.exports = {
/**
* Create a new Category
*
* @param {*} ctx The Request Context
*/
async create(ctx) {
ctx.request.body.user = ctx.state.user.id;
let entity = await strapi.services.category.create(ctx.request.body);
return sanitizeEntity(entity, { model: strapi.models.category });
},
};

Testing the create logic

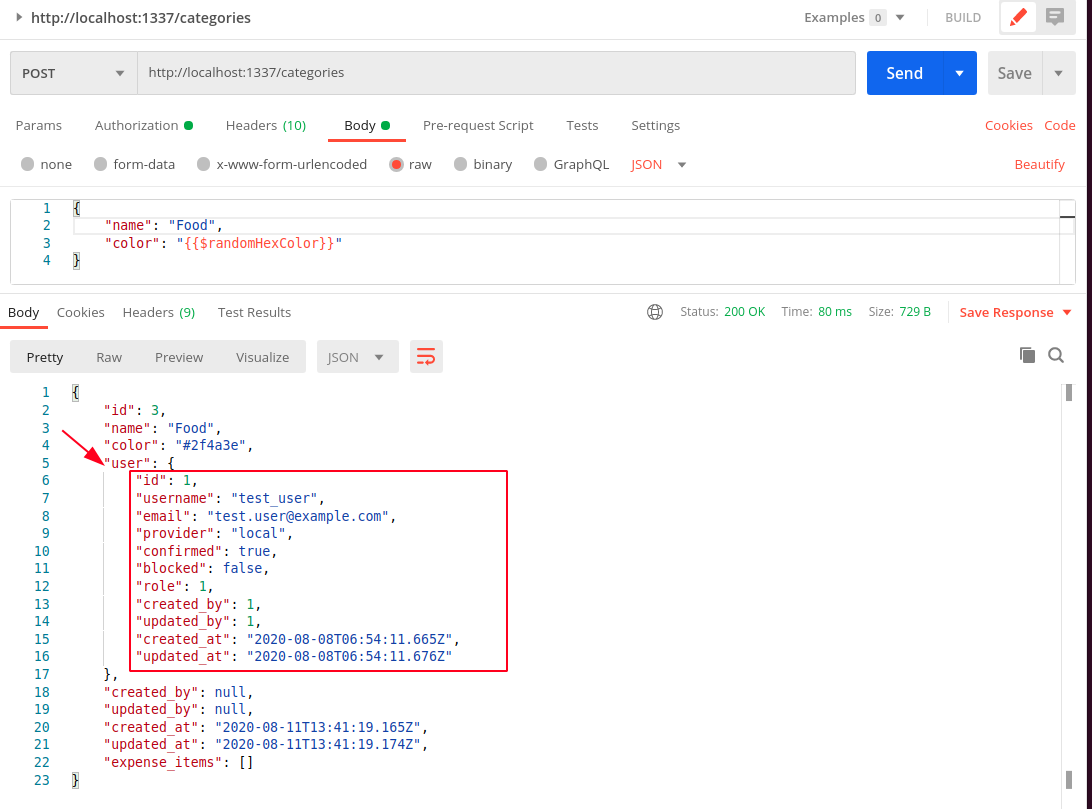
Now we can re-run the POST request to create a new category in POST and verify that the user is automatically set for the category.

strapi_new_category_with_user

Update function

Now that we have the create function auto assigning the user for the categories, let us implement restrictions for updates.

/**
* Update a category
*
* @param {*} ctx the request context
*/

async update(ctx) {
const { id } = ctx.params;

let entity;

// Find the category matching the ID and the user
const [category] = await strapi.services.category.find({
id: ctx.params.id,
'user.id': ctx.state.user.id,
});

if (!category) {
return ctx.unauthorized(`You can't update this entry`);
}

// Update the category
if (ctx.is('multipart')) {
const { data, files } = parseMultipartData(ctx);
entity = await strapi.services.category.update({ id }, data, {
files,
});
} else {
entity = await strapi.services.category.update({ id }, ctx.request.body);
}

return sanitizeEntity(entity, { model: strapi.models.category });
},

The update function adds an extra step of fetching the category and making sure that the category with that ID and userID exists before reading the request data. If the category doesn’t exist, then it returns a Unauthorized error. If it exists, then it updates the category and returns the updated information.

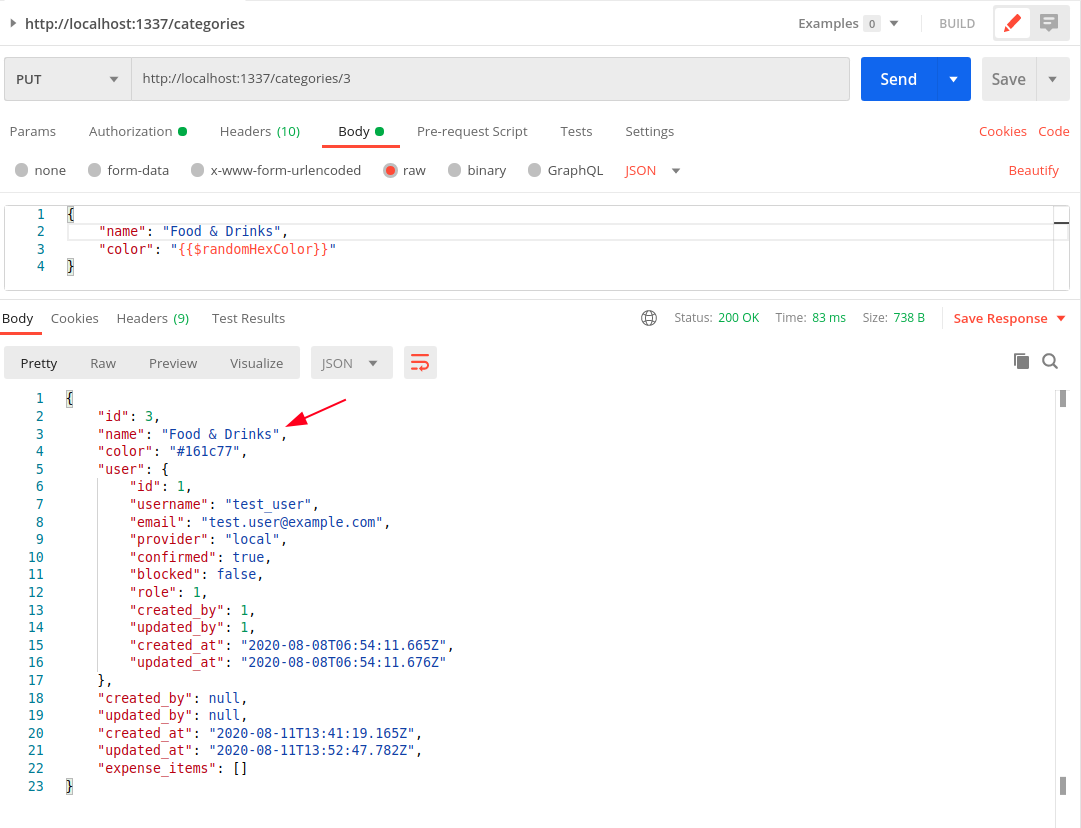
We can verify it with a PUT request to http://localhost:1337/categories/

strapi_update_category

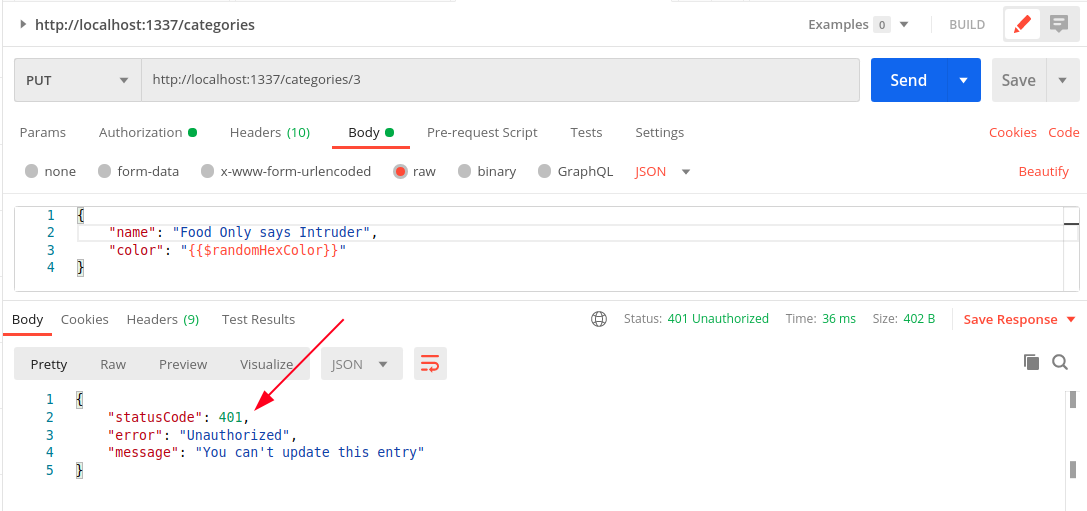
Notice that the Food category has now been updated to Food & Drinks. Not just that, using the JWT token of the intruder user wouldn’t work either.

strapi_update_unauthorized

Find function

/**
* List all the categories beloinging to the requesting user
*
* @param {*} ctx the request context
*/

async find(ctx) {
let entities;

if (ctx.query._q) {
entities = await strapi.services.category.search({
...ctx.query,
'user.id': ctx.state.user.id
});
} else {
entities = await strapi.services.category.find({
...ctx.query,
'user.id': ctx.state.user.id
});
}

return entities.map(entity => sanitizeEntity(entity, { model: strapi.models.category }));

}

The find function checks if the query is a search query or a filter and calls the corresponding function. We also pass the 'user.id' of the requesting user along with other query params from the request to filter the search results. Now when we request the url http://localhost:1337/categories, the response contains only the objects of the requesting user.

strapi_get_categories_test_user

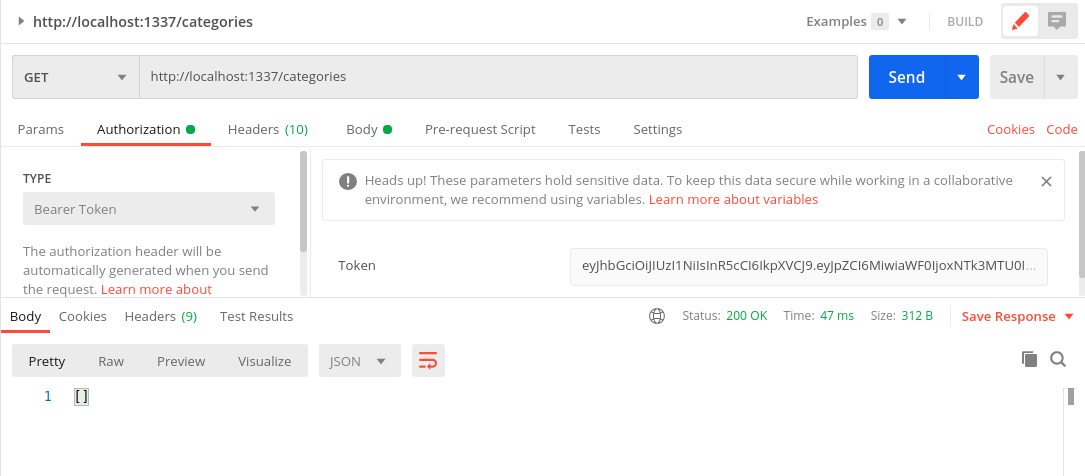
Now let us see what we get when we request as a different user

strapi_get_categories_intruder

FindOne function

/**
* Get the category with a specific ID
*
* @param {*} ctx the request context
*/
async findOne(ctx) {
const { id } = ctx.params;

const entity = await strapi.services.category.findOne({ id, 'user.id': ctx.state.user.id });

if (!entity) {
return ctx.unauthorized(`You can't view this entry`);
}

return sanitizeEntity(entity, { model: strapi.models.category });
},

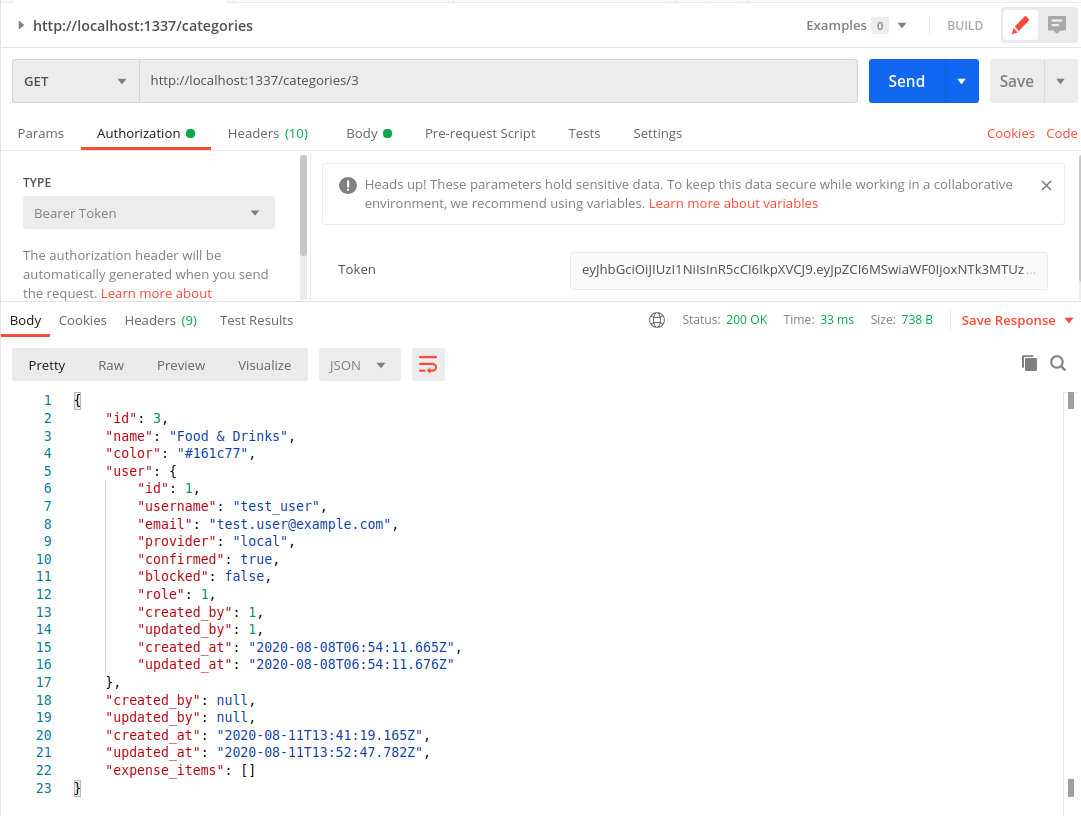
Fetching the category with id=3 as the owner (test_user)

strapi_get_one_category_test_user

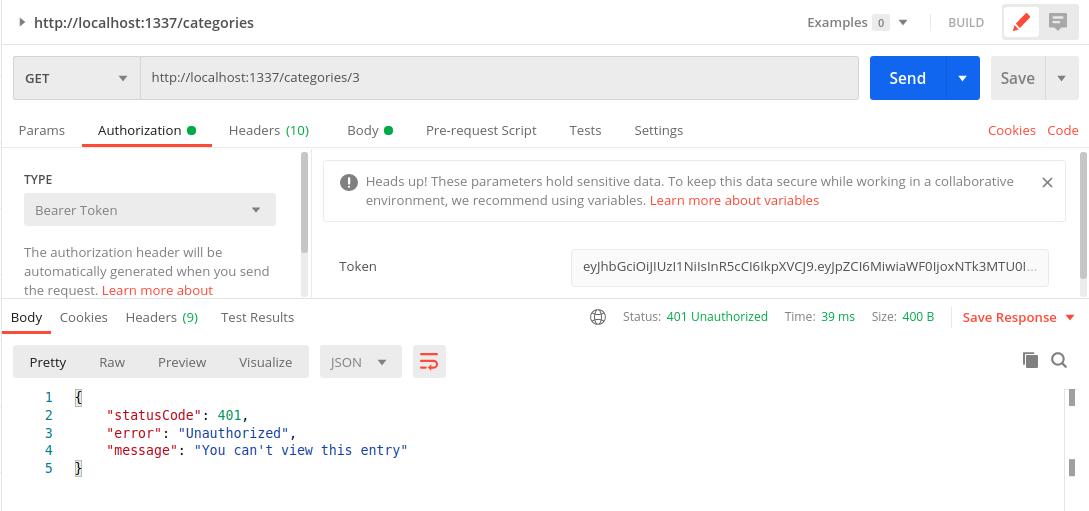
Trying to get test_user’s category as the intruder

strapi_get_one_category_intruder

Count function

/**
* Count of the categories of the requesting user
*
* @param {*} ctx the request context
*/

count(ctx) {
if (ctx.query._q) {
return strapi.services.category.countSearch({
...ctx.query,
"user.id": ctx.state.user.id,
});
}
return strapi.services.category.count({
...ctx.query,
"user.id": ctx.state.user.id,
});
},

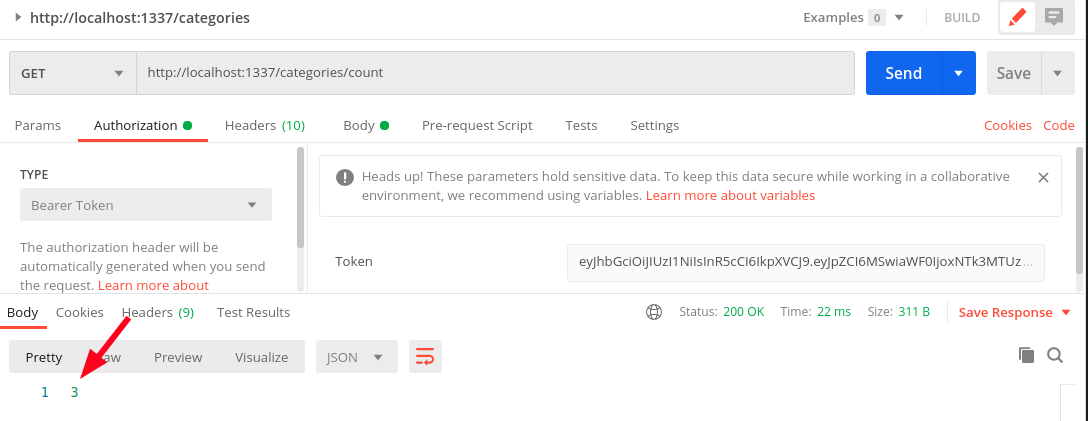
Count of test user

strapi_category_count

Delete function

/**
* Delete a record
*
* @param {*} ctx the request context
*/
async delete(ctx) {
const [category] = await strapi.services.category.find({
id: ctx.params.id,
"user.id": ctx.state.user.id,
});

if (!category) {
return ctx.unauthorized(`You can't delete this entry`);
}

let entity = await strapi.services.category.delete({ id: ctx.params.id });
return sanitizeEntity(entity, { model: strapi.models.category });
},

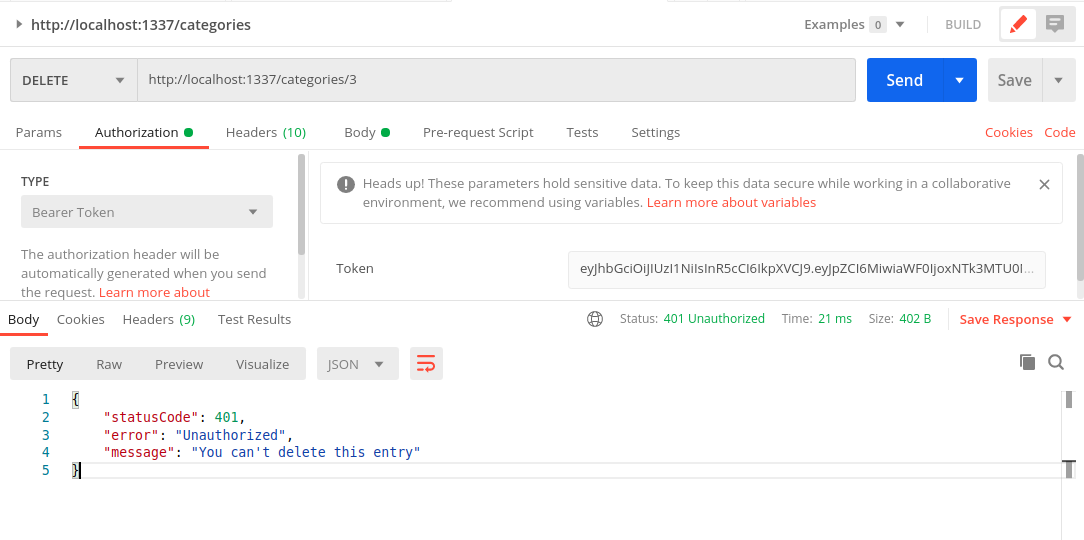
Delete as a intruder – Unauthorized

strapi_delete_intruder

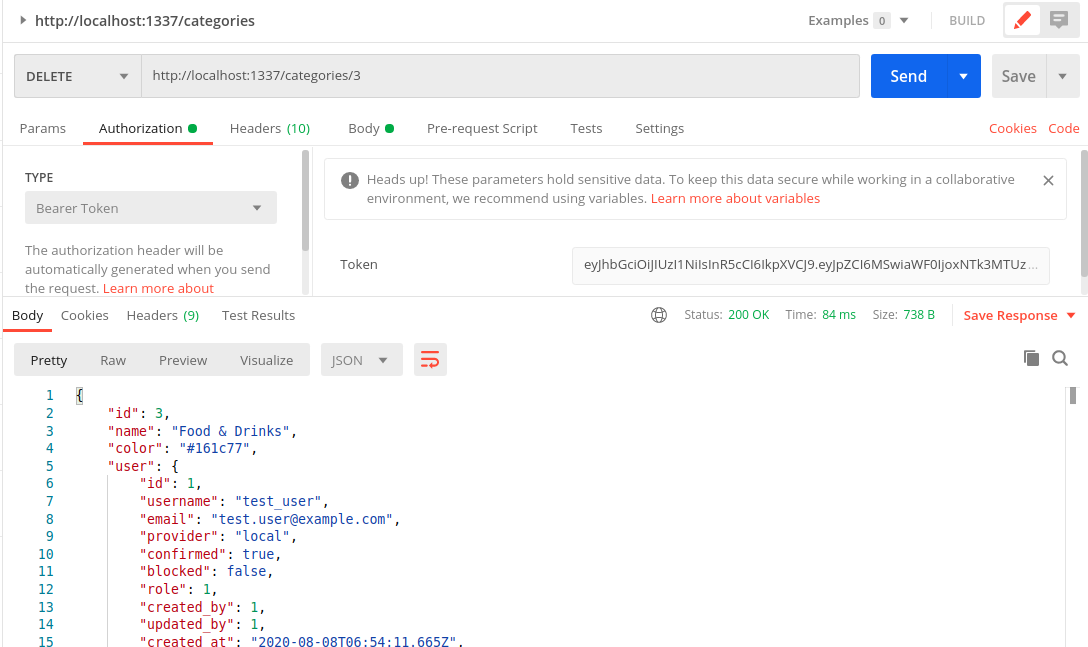
Delete as the owner – test_user

strapi_delete_test_user

Final code for the controller

Here is the complete controller code with all the functions.

'use strict';
const { parseMultipartData, sanitizeEntity } = require("strapi-utils");
/**
* Read the documentation (https://strapi.io/documentation/v3.x/concepts/controllers.html#core-controllers)
* to customize this controller
*/
module.exports = {
/**
* Create a new Category
*
* @param {*} ctx The Strapi Context
*/
async create(ctx) {
let entity;
if (ctx.is("multipart")) {
const { data, files } = parseMultipartData(ctx);
data.user = ctx.state.user.id;
entity = await strapi.services.category.create(data, { files });
} else {
ctx.request.body.user = ctx.state.user.id;
entity = await strapi.services.category.create(ctx.request.body);
}
return sanitizeEntity(entity, { model: strapi.models.category });
},
/**
* Update a category
*
* @param {*} ctx the request context
*/
async update(ctx) {
const { id } = ctx.params;
let entity;
// Find the category matching the ID and the user
const [category] = await strapi.services.category.find({
id: ctx.params.id,
"user.id": ctx.state.user.id,
});
if (!category) {
return ctx.unauthorized(`You can't update this entry`);
}
// Update the category
if (ctx.is("multipart")) {
const { data, files } = parseMultipartData(ctx);
entity = await strapi.services.category.update({ id }, data, {
files,
});
} else {
entity = await strapi.services.category.update({ id }, ctx.request.body);
}
return sanitizeEntity(entity, { model: strapi.models.category });
},
/**
* List all the categories beloinging to the requesting user
*
* @param {*} ctx the request context
*/
async find(ctx) {
let entities;
if (ctx.query._q) {
entities = await strapi.services.category.search({
...ctx.query,
"user.id": ctx.state.user.id,
});
} else {
entities = await strapi.services.category.find({
...ctx.query,
"user.id": ctx.state.user.id,
});
}
return entities.map((entity) =>
sanitizeEntity(entity, { model: strapi.models.category })
);
},
/**
* Get the category with a specific ID
*
* @param {*} ctx the request context
*/
async findOne(ctx) {
const { id } = ctx.params;
const entity = await strapi.services.category.findOne({
id,
"user.id": ctx.state.user.id,
});
if (!entity) {
return ctx.unauthorized(`You can't view this entry`);
}
return sanitizeEntity(entity, { model: strapi.models.category });
},
/**
* Count of the categories of the requesting user
*
* @param {*} ctx the request context
*/
count(ctx) {
if (ctx.query._q) {
return strapi.services.category.countSearch({
...ctx.query,
"user.id": ctx.state.user.id,
});
}
return strapi.services.category.count({
...ctx.query,
"user.id": ctx.state.user.id,
});
},
/**
* Delete a record
*
* @param {*} ctx the request context
*/
async delete(ctx) {
const [category] = await strapi.services.category.find({
id: ctx.params.id,
"user.id": ctx.state.user.id,
});
if (!category) {
return ctx.unauthorized(`You can't delete this entry`);
}
let entity = await strapi.services.category.delete({ id: ctx.params.id });
return sanitizeEntity(entity, { model: strapi.models.category });
},
};
view raw category.js hosted with ❤ by GitHub

So far …

  • Created a project
  • Added the models
  • Setup the API
  • Added the IsOwner policy to the controller

Next

Let’s do a little bit of optimisation of the API responses. If we notice the GET request responses, the relations are always fully populated. For example, if we do a GET /categories each of these categories will have the user object in it. And if you add some expense items to a category, then all of those will be returned in the GET response as well. We will try to reduce this a bit and make it more streamlined in the next part.

Strapi – Creating an API without a single line of code

Strapi is an Open Source headless CMS based on NodeJS. It provides the backend admin tools to quickly create an API – both REST and GraphQL. I picked this up for a quick project in place of my regular Python frameworks like Flask or Django, because I can have an API up and running without writing a single line of code.

This is a mini series which outlines:

  1. Setting up Strapi and creating an API – (you are here)
  2. Adding ownership control to the API endpoints
  3. Optimising REST API responses

Why this series?

There is already wealth of blog posts on using Strapi for creating a variety of websites and apps. But most of them tend to focus on capabilities of vanilla Strapi. I want to focus on a couple of customisations that I made when using it to build a web application.

Our example app

Our example API is for an expense management system. Users can do the following things via the API:

  1. CRUD operations on Expense items
  2. CRUD operations on Categories which will be used to group the expense items

Note: I am not going to get into building frontend in this series, we will just focus on Strapi and the API

Installing Strapi

The Strapi Documentation is probably the best source for this based on your method of choice. You can install it on local machine, just pull a docker container or use a cloud provider like Digital Ocean or Platform.sh.

I will refrain from posting the instructions here to avoid duplication.

Creating the Admin Account

Once you have created a new project, start the application in development mode.

yarn develop

Side note: This is very important, I once started it using the yarn start command and spent a solid 5 minutes searching why all the edit functionalities have disappeared.

You will be greeted with a admin registration screen like this one.
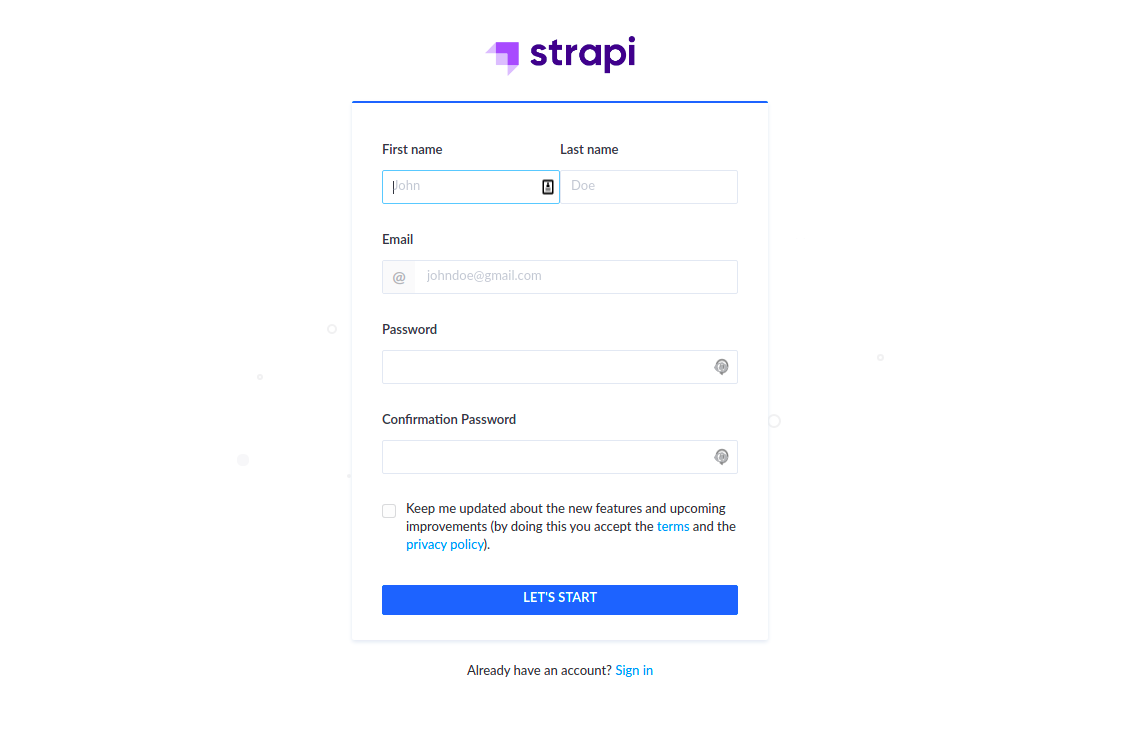
strapi-register-admin

Fill in the information and create the admin account. This should log you in and show the Admin Homepage
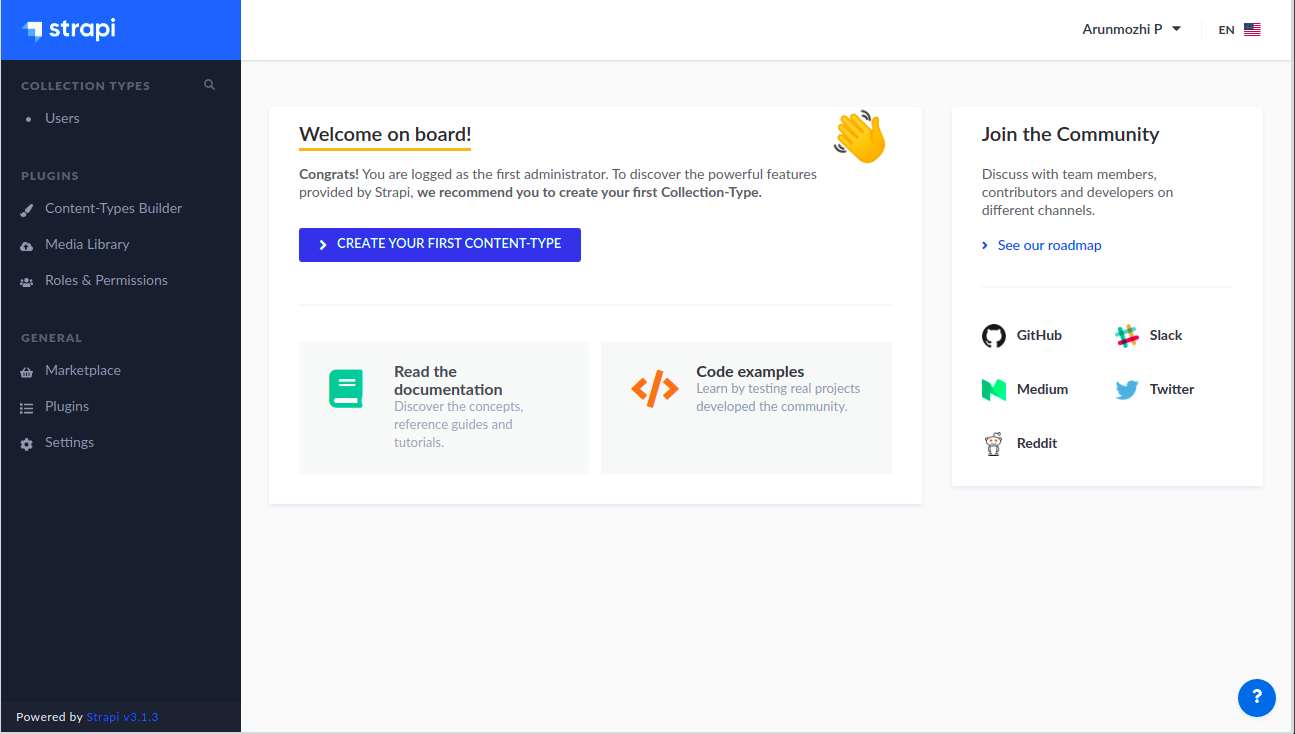
strapi-admin-home

Creating the Models

Strapi employs the well known MVC (Model-View-Controller) pattern. So, the first step is to define the Models for the API. Models are called as “Content-Type” in Strapi due to the CMS nature of the application. Click the “Create Your First Content-Type” button on the home page to create our first model – Category.
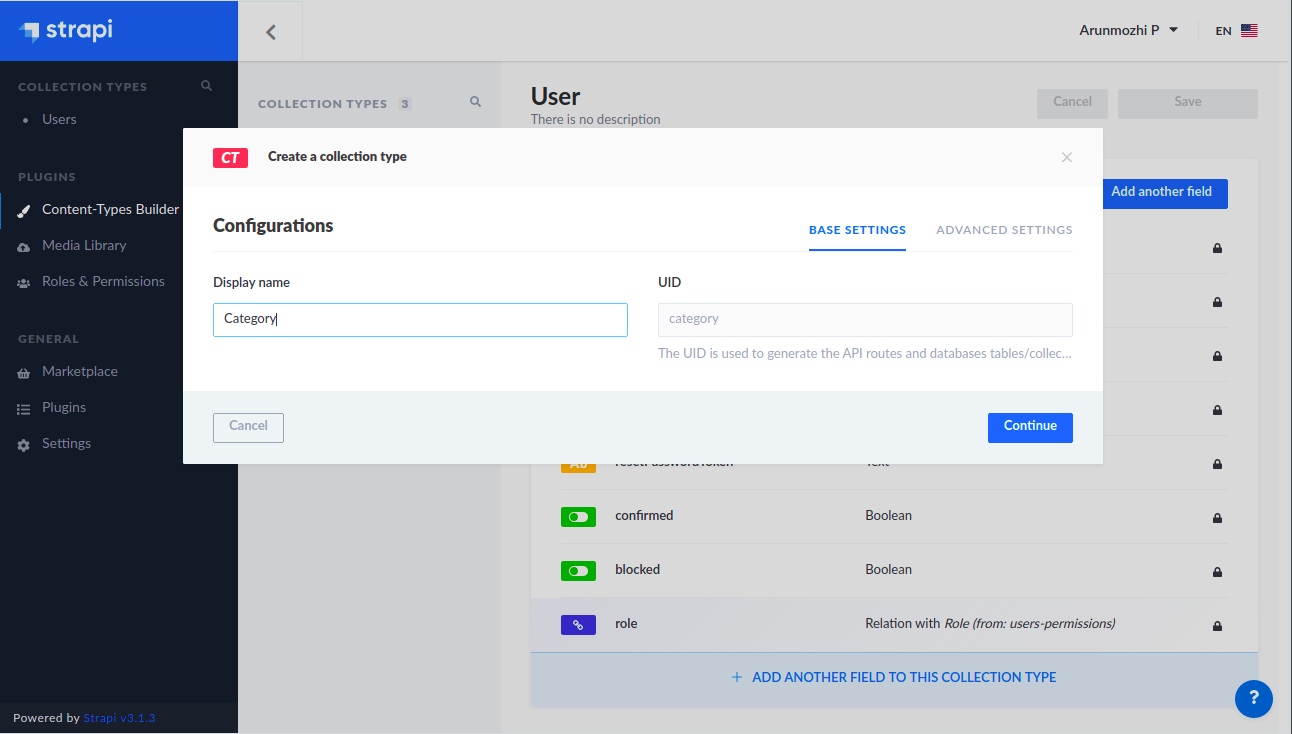
strapi-category

Click Continue, now we can add the fields for the model.
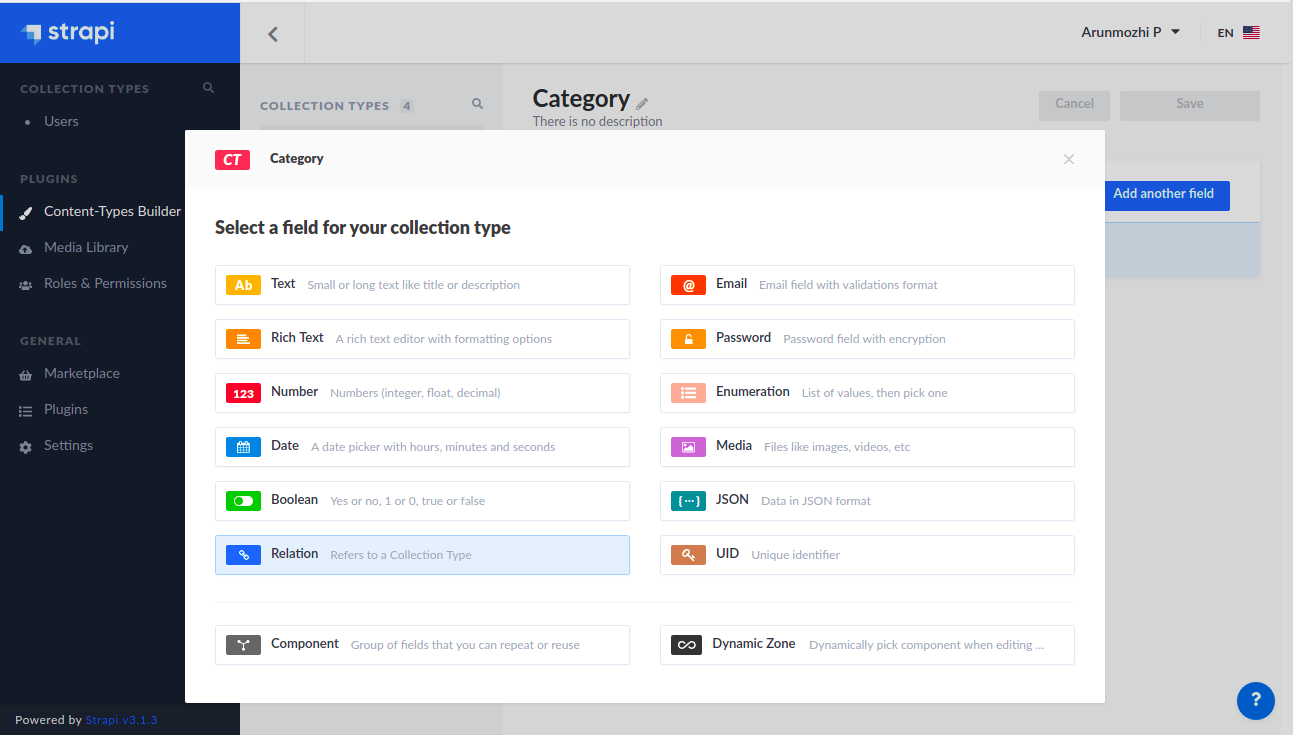
strapi-fields

The category model is going to have two fields:

  1. name – a string – the name of the category
  2. color – a string – the hex code of the category color which be used for the frontend

Since both of them are strings, let’s click Text and create the fields
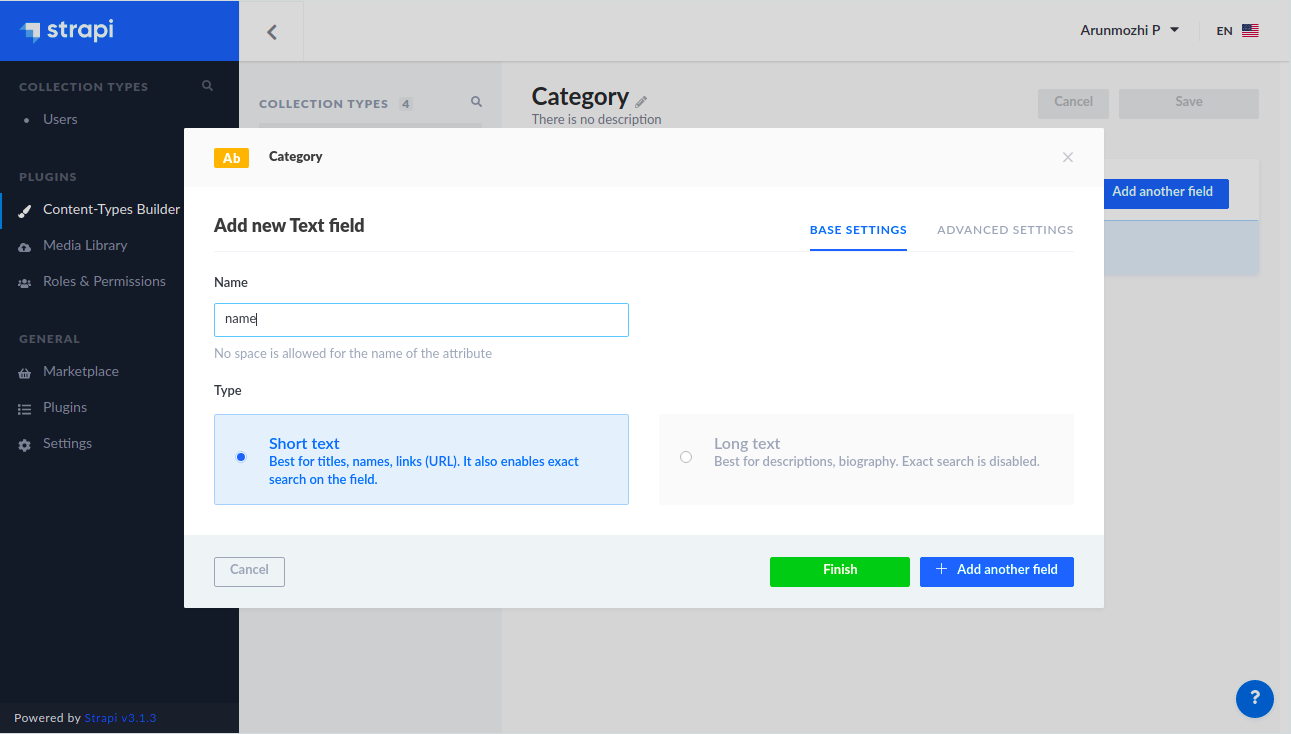
strapi-category-name

When we describe models in code, we usually have some constraints like primary key, unique, not-null ..etc., In this case we want the categories to have a name and have a minimum of 2 characters. We can specify that by switching to the Advanced Settings tab and setting the constraints.
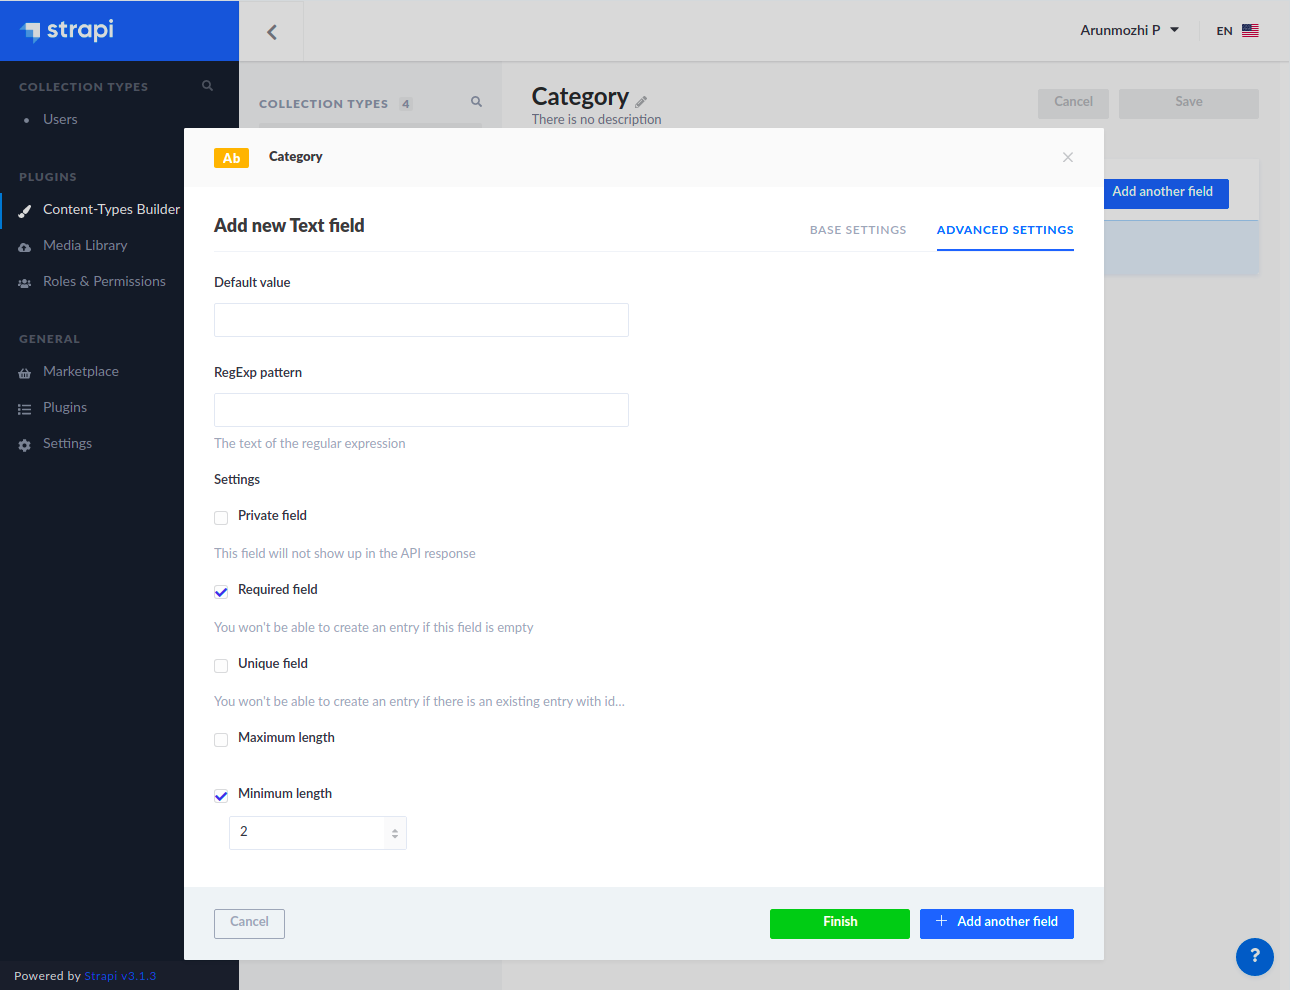
strapi-text-advanced-settings

Click + Add another field and create another “Text” field for color. (I am leaving the screenshot out for that one)

Click finish after putting in the details for color field.
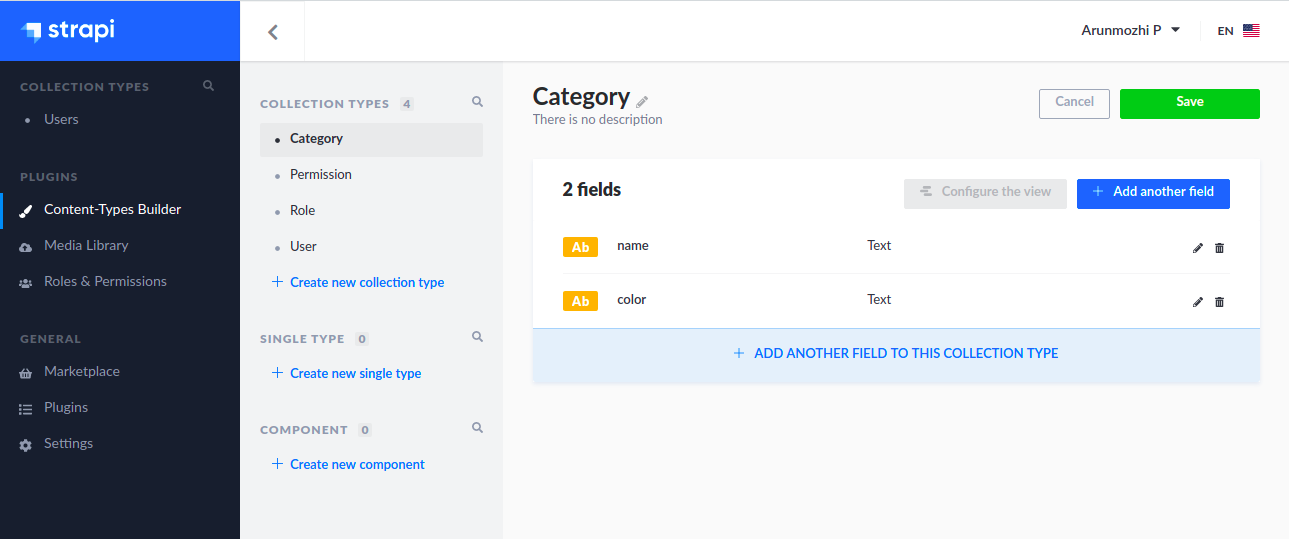
strapi-category-2

We want the Categories to be user specific. So we need to add a relationship between the User Model which is already there and between the Category model which we just created.

  • Click “Add another field” button again and select Relation.
  • On the relation dialog on the right side, click the dropdown next to Category and select User.
  • In the middle relationship buttons select the Many-to-One icon such that the description reads (User has many Categories)
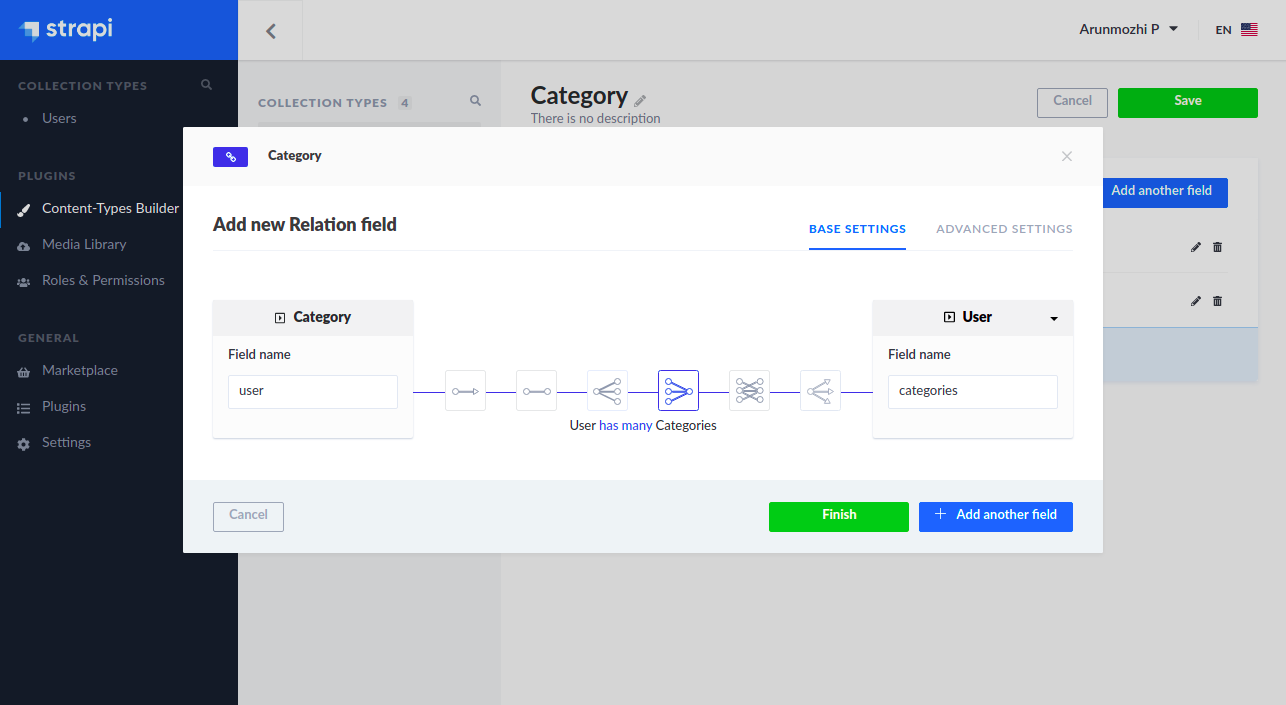
strapi-category-user-relation

  • Click Finish and Click Save
  • Strapi will save this changes to the application and restart the application.
  • Now if you open the api folder and look at the contents you will see the files that Strapi created for the ‘Category’ Model
api
└── category
├── config
│   └── routes.json
├── controllers
│   └── category.js
├── models
│   ├── category.js
│   └── category.settings.json
└── services
└── category.js

Exercise: Create the Expense Item model

Now that we know the steps to create a model visually, I am going to leave creating the Expense Item Model as an exercise. The model will have the following fields

  1. amount – Number – Floating point value to hold the expense amount
  2. name – Text – A short description of the expense
  3. date – Date – The date when the expense was made
  4. category – Relation – category of the expense (Category has many Expense Items)
  5. user – Relation – User the expense item belongs (User has many Expense Items)
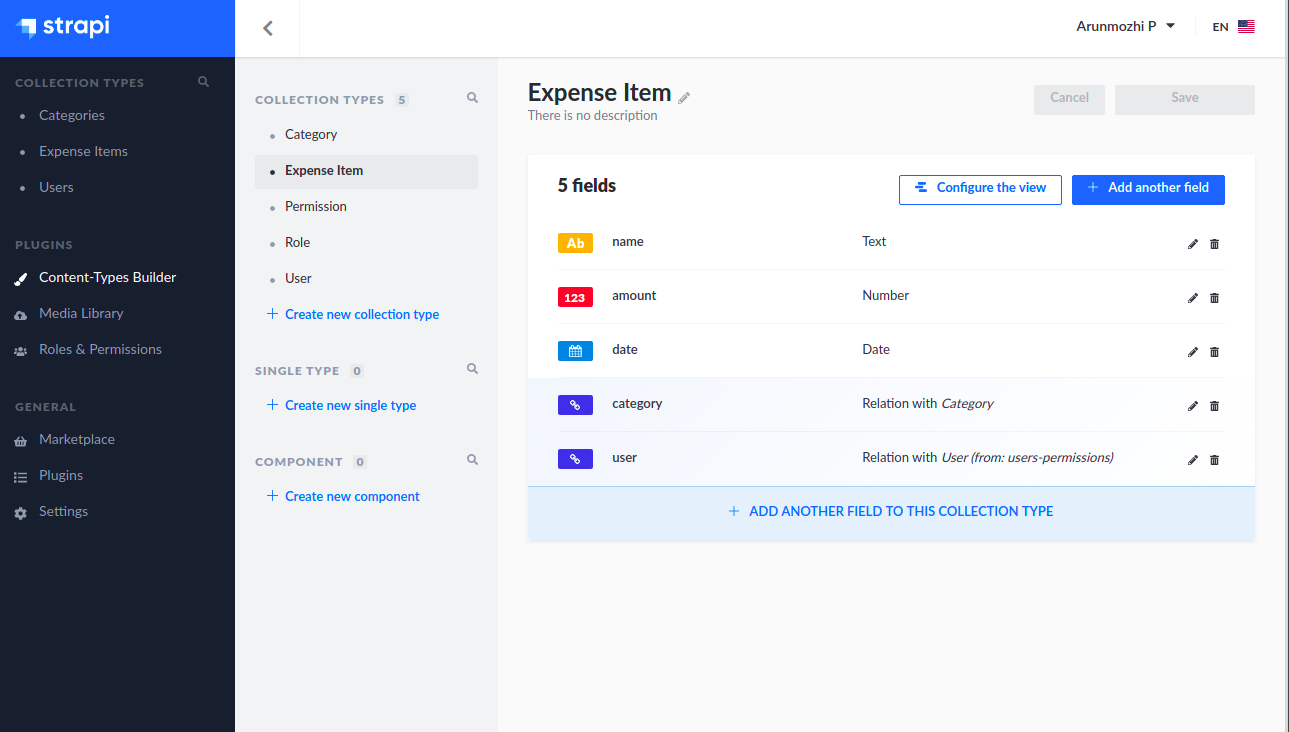
strapi-expense-item

Testing the REST API

Now that our models and controllers are all in place, our API is ready. Let us try it out by visiting http://localhost:1337/categories

strapi-403

Oops, we don’t have access. While it is a disappointment, it is actually a good thing. By default Strapi doesn’t allow access to any resources. We need to configure access rules for the API to be usable. Let us do that by heading back to Strapi admin page.

Enable API Access

Go to the Strapi Admin page, click the Roles and Permissions on the sidebar and click on the edit button for Authenticate.
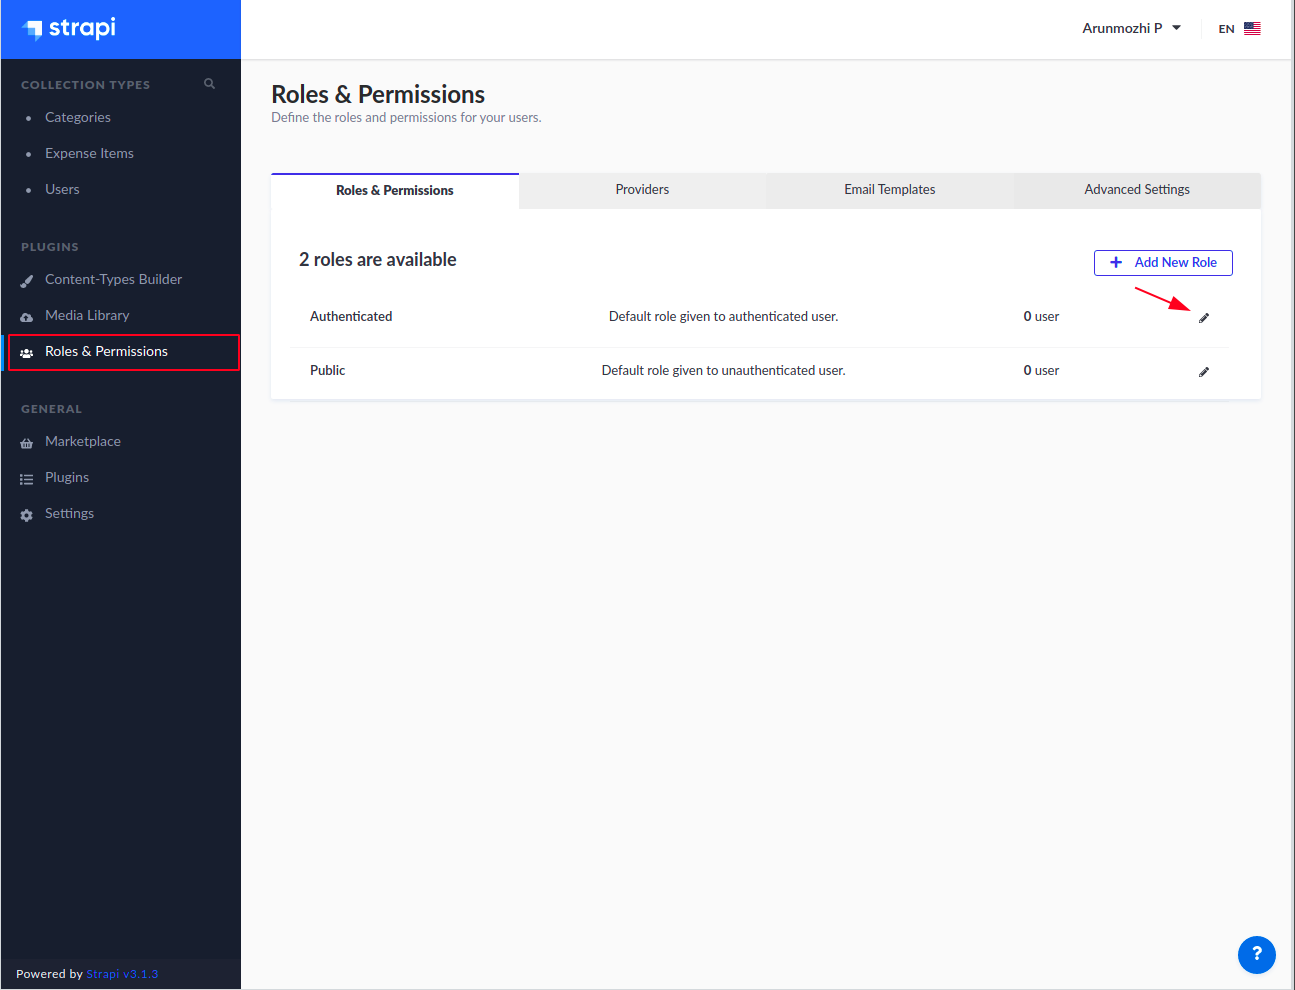
strapi-roles-permissions

In the Permissions, click Select All for Category and Expense-Item and Save. This will allow any user who is logged into to perform all sorts of operations on the Category and Expense Item models.
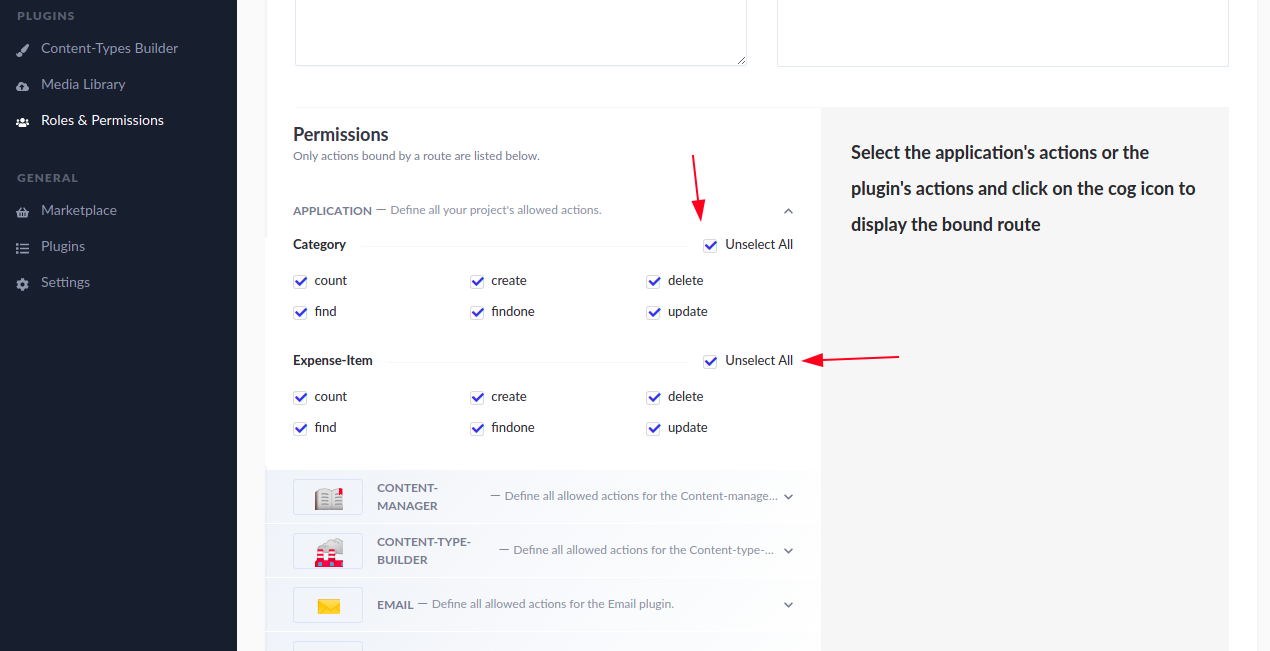
strapi-select-all

Create a test user

It can be noticed that the Roles & Permissions page shows “0 User” for the Authenticated role despite us logged in as the admin. That’s because Strapi considers Super Admin users different from users created for the User content type. So, we will create a new user who will act as the test user.

  • On the sidebar click Users under Collection Types
  • Click “Add new user”
  • Input username, email and password
  • Set confirmed to ON (we are going to skip the whole email confirmation here)
  • Click Save

Now if you switch to the Roles & Permissions page, you should see it say “1 User” in the Authenticated row.

Testing the API as an authenticated user

Side Note: I will use Postman to test the API. You can use whatever you are comfortable with using this as reference: Authenticated Request

In order for the requests to be sent as an authenticated user, we need a use the JWT returned during login and use it as the Bearer Token. So, let us login at http://localhost:1337/auth/local
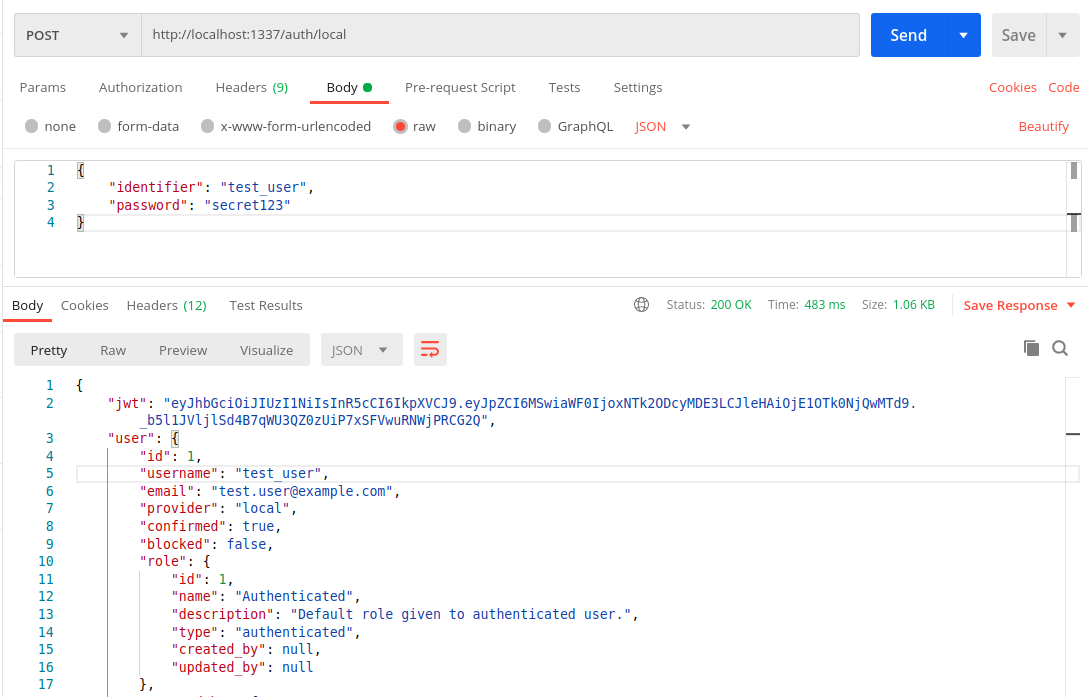
strapi-user-auth

Let us copy that JWT token from the response and use it to test http://localhost:1337/categories
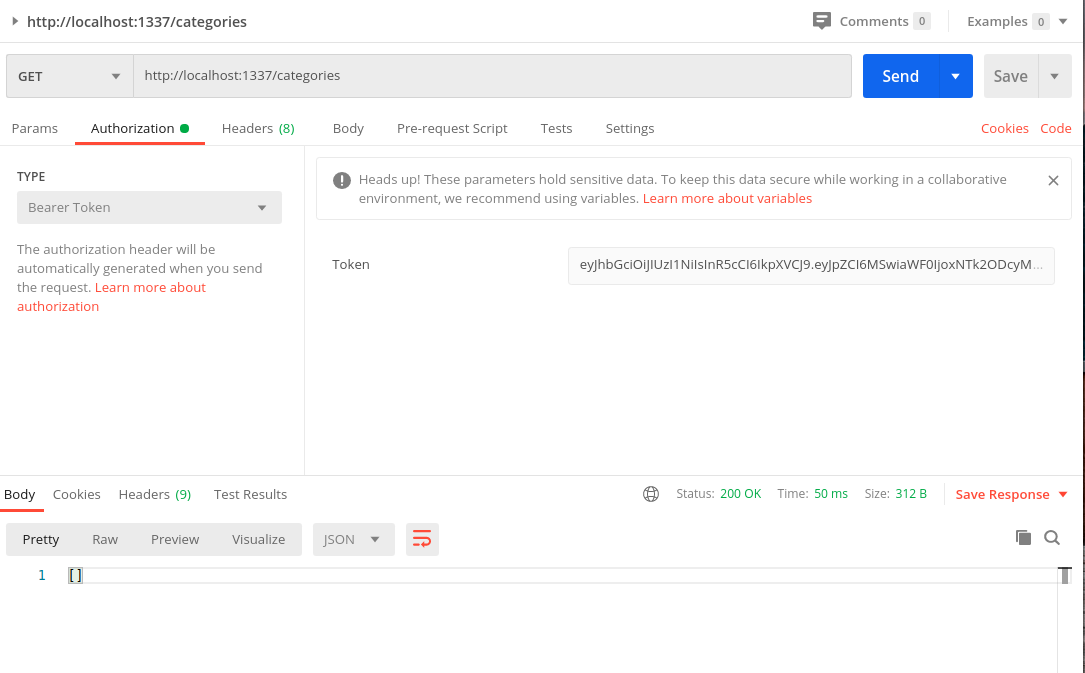
strapi-get-categories

The 403 Forbidden error is gone and we have a 200 OK response with empty array []. Now let us create a Category using a POST request with the same request.

  • Set the method to POST
  • Switch to the Body Tab
  • Select raw and type JSON and
  • Enter the data as

{
“name”: “Travel”,
“color”: “{{$randomHexColor}}”
}

Side Note: I like how Postman provides functions to generate values like random colors.
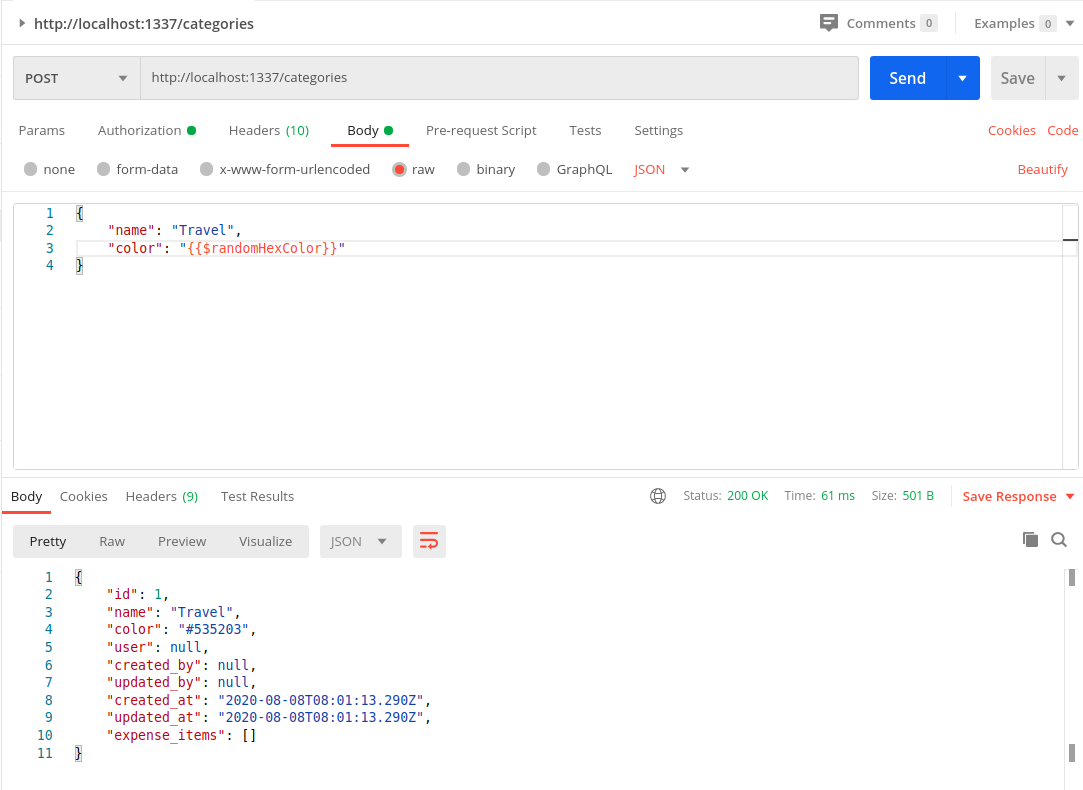
strapi-new-category

Response

{
“id”: 1,
“name”: “Travel”,
“color”: “#535203”,
“user”: null,
“created_by”: null,
“updated_by”: null,
“created_at”: “2020-08-08T08:01:13.290Z”,
“updated_at”: “2020-08-08T08:01:13.290Z”,
“expense_items”: []
}

A new category has been created with the with the ID 1. But notice that the user attribute is actually null. That is because we didn’t pass the “user” attribute in the POST request. We shouldn’t have to. That information is already available with Strapi in the form of JWT token we have sent with the request.

How do we make Strapi automatically populate the user field?

Before we answer that, let us test another thing related to this user issue.

Testing Access Control of Users

  1. Create another user in the Strapi Admin window, let us call the user intruder
  2. Now log in as the intruder user and get the JWT Token
  3. Using intruder‘s JWT token let us send a get request to the /categories
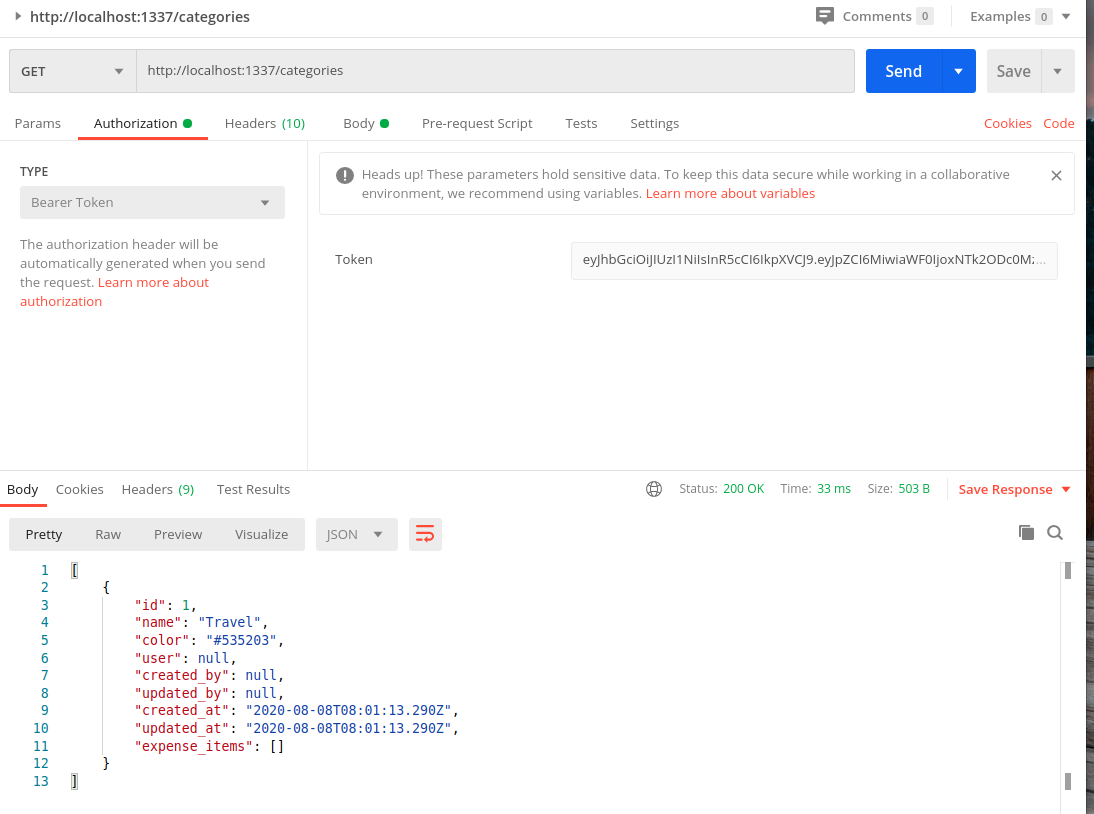
strapi-intruder-access

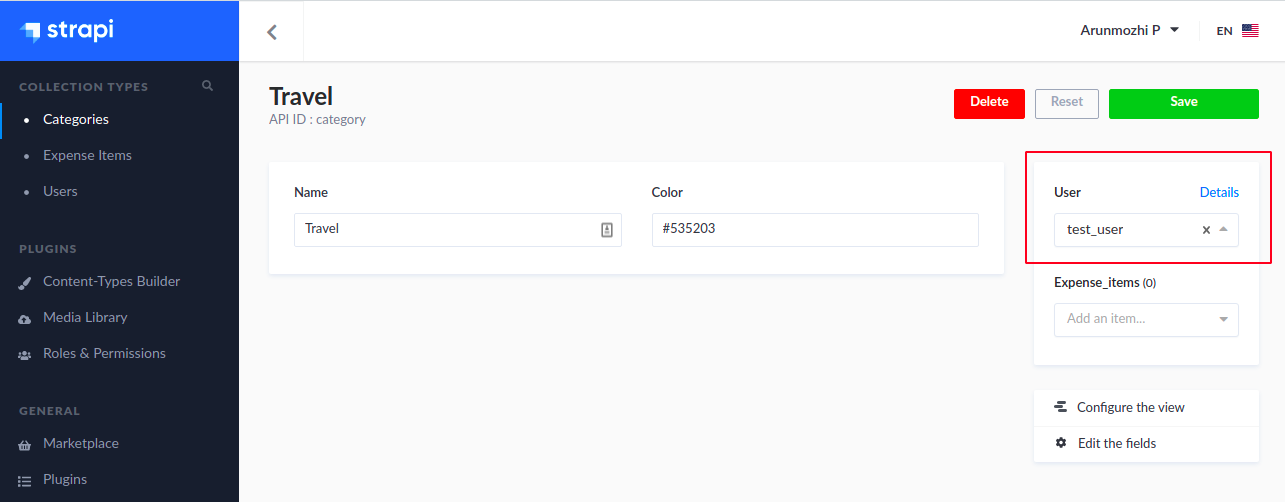
The intruder is able to access the category created by test_user. This will happen even if the user value is not null. For example, go to the Strapi Admin and set the user value of the “Travel” category to test_user
strapi-set-category-user

Now switch back to Postman, don’t change anything and rerun the GET /categories request again.
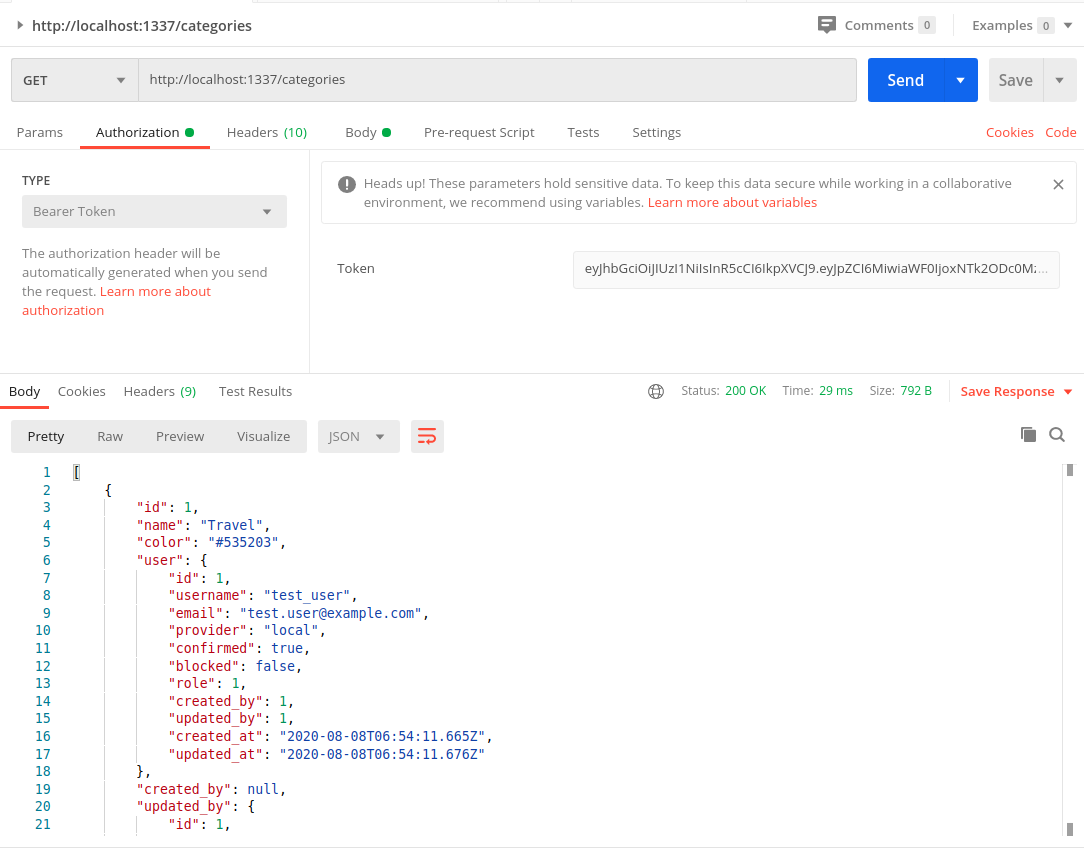
strapi-intruder-access-2

You will notice that we are still able to access test_user‘s information as intruder.

To summarise:

  1. We created the category as test_user
  2. We have set the category to belong to test_user
  3. We made request using intruder’s token
  4. And we are able to access test_user’s data

So, any authenticated user can read anyone’s data. Not just read, if you recall the settings from “Roles & Permission”, they can also change and delete anyone’s data. Effective making the entire API useless.

Restricting access to Owners

Now we have identified two issues:

  1. Automatically assigning ownership of a category to the user creating the category (discussed before)
  2. Restricting access to data owners only

Both of these can be solved by modifying the Controller logic of the models. We will deal with that in the next part.

So far…

The impressive thing about using Strapi for an API is the amount of stuff that comes out of the box.

  1. Setup the project structure with necessary libraries
  2. An nice Admin backend
  3. Create Models with relationships, constraints and validations
  4. Token based authentication for API access

All of this without writing a single line of code. If we have used a regular library, we would be swimming in configurations and routes by now.

Next

Strapi – Add Ownership and Control to API
text/plain MIME Type and Python

When you do echo "x" > my_file and then check its MIME type using file --mime-type my_file it would say text/plain. But, when you do the same in Python by

with open("my_file_2", "w") as fp:
fp.write("x")

and then check the MIME type it would say application/octet-stream. What’s the difference?

For the impatient

echo adds a new line to file which tells the file utility it is a text file.

For the curious

When I saw this question on StackOverflow, I was really stumped due to the following reasons:
  1. I didn’t know the file utility can be used to get the mime-type of the file. I thought MIME Type is only relevant in the context of web server and clients. After all, MIME stands for Multipurpose Internet Mail Extensions
  2. I thought operating systems usually use the file extension to decide the file type, by extension the mime type. Don’t the OSes warn when we touch the extension part of the files while renaming, all the time? So, how does file utility do this on a files without any extension?

Adding extensions

Lets try adding extensions:

$ echo "x" > some_file.txt
$ file --mime-type some_file.txt
some_file.txt: text/plain

Okay, that’s all good. Now to the Python side:

with open("some_file_2.txt", "w") as fp:
fp.write("x")
$ file --mime-type some_file_2.txt
some_file_2.txt: application/octet-stream

What? file doesn’t recognise file extensions?

The OS conspiracy theory

Maybe echo writes the mimetype as a metadata onto the disk because echo is a system utility and it knows to do that and in Python the user (me) doesn’t know how to? Clearly the operating system utilities are a cabal of some forbidden knowledge. And I am going to uncover that today, starting with the file utility which seems to have different answers to different programs.

How does ‘file’ determine MIME Type?

Answers to this question has some useful information:

How do you change the MIME type of a file from the terminal?

  1. MIME Type is a fictional value. There is no inherent metadata field that stores MIME Types of files.
  2. Each operating system uses a different technique to decide file type. Windows uses file extension, Mac OS uses type creator & type codes and Unix uses magic numbers.
  3. The file command guesses file type by reading the content and looking for magic numbers and strings.

Time to reveal the magic

Let us peer into the souls of these files in their purest forms where there is no magic but only 1s and 0s. So, I printed the binary representation of the two files.

$ xxd -b my_file
00000000: 01111000 00001010 x.

$ xxd -b my_file_2
00000000: 01111000 x

The file generated by echo has two bytes (notice the . after the x) whereas the file I created with Python only has one byte. What is that second byte?

>>> number = int('00001010', 2)
>>> chr(number)
'\n'

And it turns out like every movie on magic, there is no such thing as magic. Just clever people putting new lines to tell file it is a text file.

Creating a trick

Now that the trick is revealed, lets create our own magic trick

$ echo "<file></file>" > xml_file
$ file --mime-type xml_file
xml_file: text/plain

$ echo "<?xml version="1.0"?><file></file>" > xml_file
$ file --mime-type xml_file
xml_file: text/xml

Useful Links

  1. https://www.baeldung.com/linux/file-mime-types
  2. https://unix.stackexchange.com/questions/185216/file-command-apparently-returning-wrong-mime-type
  3. https://stackoverflow.com/questions/29017725/how-do-you-change-the-mime-type-of-a-file-from-the-terminal

Jupyter – Finding the point when a line graph crosses the threshold

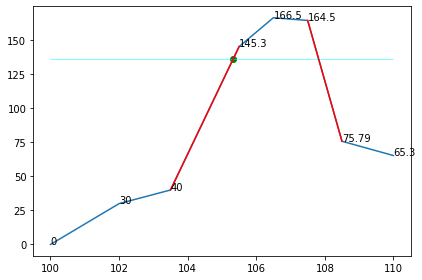
A friend of came up with the problem. There are a set of points [(x, y), (x1, y1), (x2, …]. He wanted to find the points at which this line would pass the value Z less than the peak. If the maximum value is 100 and Z = 20. He wanted to find the points where it would cross y = 80.

Now there are multiple ways to solve this problem. I attempted a simple linear interpolation solution.

I don’t the solution itself to be a big thing. What I am really impressed is, how neatly I was able to present the solution using Jupyter Notebook to him.

I was able to document the solution in a step by step fashion, with visual representation of how I solved it.

Take a look

from IPython.display import display
import matplotlib.pyplot as plt

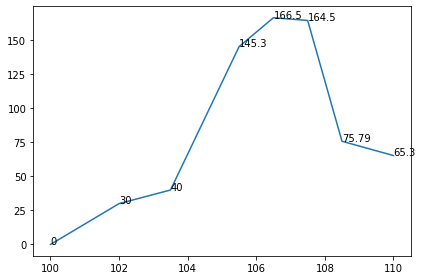
f = [100, 102, 103.5, 105.5, 106.5, 107.5, 108.5, 110]
mag = [0, 30, 40, 145.3, 166.5, 164.5, 75.79, 65.3]

fig, ax = plt.subplots()
ax.plot(f, mag)

for x,y in zip(f, mag):
    label = ax.text(x, y, y)

fig.tight_layout()

inter_fig_1

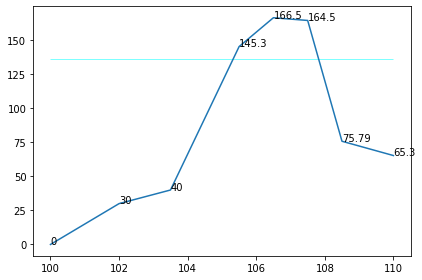
gap = 30

# 1. Find the maximum value
max_mag = max(mag)

# 2. Set the threshold value
y = max_mag - gap

ax.hlines(y, f[0], f[-1], linewidth=0.5, color="cyan")
display(fig)

inter_fig_2

max_idx = mag.index(max_mag)

# 4. Find the left and right values which are lower than the "y" you are looking for
left_start_idx = None
left_end_idx = max_idx
right_start_idx = max_idx
right_end_idx = None

for i in range(max_idx):
    left_idx = max_idx - i
    right_idx = max_idx + i

    # if left index is more than Zero (array left most is 0) and left is not yet set
    if left_idx >= 0 and not left_start_idx:
        value = mag[left_idx]
        # if the value is lower than our threshold then pickup the point
        # and the one next to it
        # that will form our segment to interoploate
        if value < y:  
            left_start_idx = left_idx
            left_end_idx = left_idx + 1


    # if the right index is less than our array size (0..N) and right is not yet set
    if right_idx < len(mag) and not right_end_idx:
        value = mag[right_idx]
        if value < y:
            right_end_idx = right_idx
            right_start_idx = right_idx - 1

if not right_end_idx:
    print("Cannot find point on the right lower than %d" % (y))

if not left_start_idx:
    print("Cannot find point on the left lower than %d" % (y))

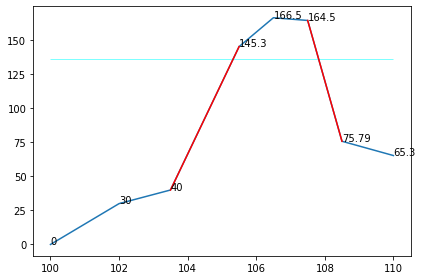
# Plotting the lines we will be interpolating

if left_mag and right_mag:
    ax.plot(
        [f[left_start_idx], f[left_end_idx]],
        [mag[left_start_idx], mag[left_end_idx]],
        color='red'
    )
    ax.plot(
        [f[right_start_idx], f[right_end_idx]],
        [mag[right_start_idx], mag[right_end_idx]],
        color='red'
    )

display(fig)

inter_fg_3

Now Let us use the line equation

\frac{y - y1}{x - x1} = \frac{y2 - y1}{x2 - x1}

Solving for x we get

x = x1 + (x2 - x1) \frac{y - y1}{y2 - y1}

# Left point interpolation

y1 = mag[left_start_idx]
y2 = mag[left_end_idx]
x1 = f[left_start_idx]
x2 = f[left_end_idx]

x = x1 + (x2 - x1) * (y - y1) / (y2 - y1)

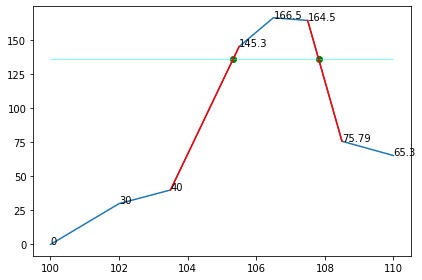
ax.scatter([x], [y], color="green")
display(fig)

inter_fig_4

# Right point interpolation

y1 = mag[right_start_idx]
y2 = mag[right_end_idx]
x1 = f[right_start_idx]
x2 = f[right_end_idx]

x = x1 + (x2 - x1) * (y - y1) / (y2 - y1)

ax.scatter([x], [y], color="green")
display(fig)

inter_fig_5

I was able to export the whole thing as a PDF and send it to him.

Simplifying a Factory Pattern function that has grown complex

This is a combination of the problem that I posted in Dev.to and StackExchange and the final solution that I adopted.

The Problem

I have a function which takes the incoming request, parses the data and performs an action and posts the results to a webhook. This is running as background as a Celery Task. This function is a common interface for about a dozen Processors, so can be said to follow the Factory Pattern. Here is the psuedo code:

processors = {
    "action_1": ProcessorClass1, 
    "action_2": ProcessorClass2,
    ...
}

def run_task(action, input_file, *args, **kwargs):
    # Get the input file from a URL
    log = create_logitem()
    try:
        file = get_input_file(input_file)
    except:
        log.status = "Failure"

    # process the input file
    try:
        processor = processors[action](file)
        results = processor.execute()
    except:
        log.status = "Failure"

    # upload the results to another location
    try:
        upload_result_file(results.file)
    except:
        log.status = "Failure"

    # Post the log about the entire process to a webhoook
    post_results_to_webhook(log)

This has been working well for most part as the the inputs were restricted to action and a single argument (input_file). As the software has grown, the processors have increased and the input arguments have started to vary. All the new arguments are passed as keyword arguments and the logic has become more like this.

try:
    input_file = get_input_file(input_file)
    if action == "action_2":
       input_file_2 = get_input_file(kwargs.get("input_file_2"))
except:
    log.status = "failure"


try:
    processor = processors[action](file)
    if action == "action_1":
        extra_argument = kwargs.get("extra_argument")
        results = processor.execute(extra_argument)
    elif action == "action_2":
        extra_1 = kwargs.get("extra_1")
        extra_2 = kwargs.get("extra_2")
        results = processor.execute(input_file_2, extra_1, extra_2)
    else:
        results = processor.execute()
except:
    log.status = "Failure"

Adding the if conditions for a couple of things didn’t make a difference, but now almost 6 of the 11 processors have extra inputs specific to them and the code is starting to look complex and I am not sure how to simplify it. Or if at all I should attempt at simplifying it.

Something I have considered:
1. Create a separate task for the processors with extra inputs – But this would mean, I will be repeating the file fetching, logging, result upload and webhook code in each task.
2. Moving the file download and argument parsing into the BaseProcessor – This is not possible as the processor is used in other contexts without the file download and webhooks as well.

The solution

I solved it by making two important changes:

  1. Normalised the processor’s by making the common arguments positional and everything else keyword based. This allows me to pass the kwargs as I receive them without unpacking. It is the processor’s job.
  2. For the extra files, make a copy of the kwargs and replace the remote file url with the local file location. This way, the extra files are a part of the kwargs dict itself.
def run_task(action, input_file, *args, **kwargs):

    params = kwargs.copy()

    # Get the input file from a URL
    log = create_logitem()
    try:
        file = get_input_file(input_file)
        if action == "action_2":
           params["extra_file"] = get_input_file(kwargs["extra_file"]  # update the files in params
    except:
        log.status = "Failure"

    # process the input file
    try:
        processor = processors[action](file)
        results = processor.execute(**params)   # Unpack and pass the params
    except:
        log.status = "Failure"

    # upload the results to another location
    try:
        upload_result_file(results.file)
    except:
        log.status = "Failure"

    # Post the log about the entire process to a webhoook
    post_results_to_webhook(log)

Now I have the same lean structure as I originally had. The only processor specific code is the file downloads which I think I can live with for now.

Credits

Kain0_0‘s answer pointed me in the right direction and helped me simplify it in a way that makes sense.

Employing VueJS reactivity to update D3.js Visualisations – Part 2

In Part 1, I wrote about using Vue’s reactivity directly in the SVG DOM elements and also pointed out that it could become difficult to manage as the visualisation grew in complexity.

We used D3 utilities for computation and Vue for the state management. In this post we are going to use D3 for both computation and state management with some help from Vue.

Let us go back to our original inverted bar chart and the code where we put all the D3 stuff inside the mounted() callback.

I am going to add a button to the interface so we can generate some interactivity.

<template>
  <section>
    <h1>Simple Chart</h1>

    <button @click="updateValues()">Update Values</button>

    <div id="dia"></div>
  </section>
</template>

… and define the updateValues() inside the methods in the script

export default {
  name: 'VisualComponent`
  data: function() {
    return {
      values: [1, 2, 3, 4, 5]
    }
  },
  mounted() {
    // all the d3 code in here
  },

  methods: {
    updateValues() {
      const count = Math.floor(Math.random() * 10)
      this.values = Array.from(Array(count).keys())
  }

}

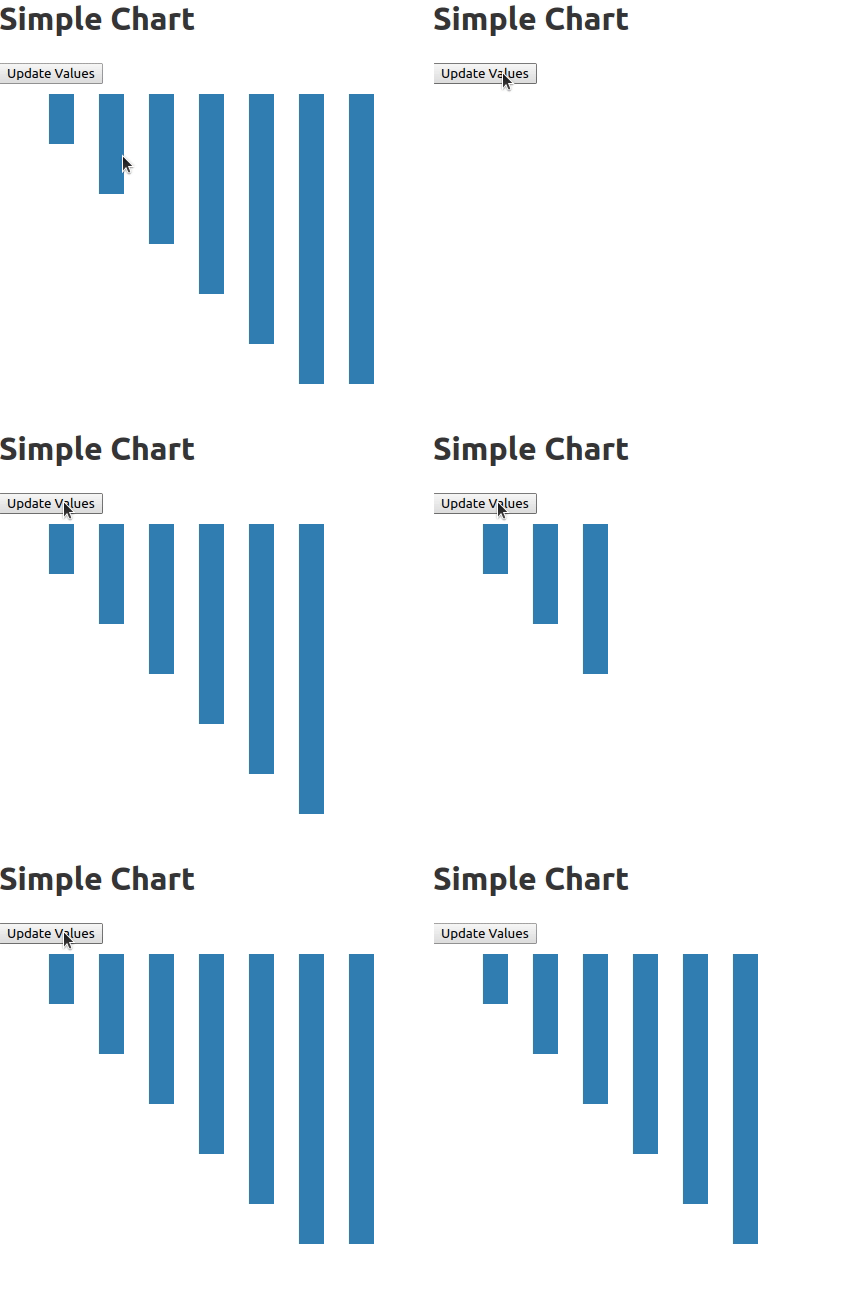
Now, every time the button is clicked, a random number of elements (0 to 10) will be set to the values property of the component. Time to make the visualization update automatically. How do we do that?

Using Vue Watchers

Watchers in Vue provide us a way track changes on values and do custom things. We are going to combine that with our knowledge of D3’s joins to update out visualization.

First I am going to make a couple of changes so we can access the visualization across all the functions in the component. We currently have this

 mounted() {
    const data = [1, 2, 3, 4, 5]
    const svg = d3
      .select('#dia')
      .append('svg')
      .attr('width', 400)
      .attr('height', 300)

    svg
      .selectAll('rect')
      .data(data)
      .enter()
      ...
 }
  1. We are going to remove the data and replace it with this.values. This will allow us to access the data anywhere from the visualization
  2. We are going to track the svg as a component data value instead of a local constant.
  ...
  data: function() {
    return {
      values: [1, 2, 3, 4, 5],
      svg: null  // property to reference the visualization
    }
  },
  mounted() {
    this.svg = d3
      .select('#dia')
      .append('svg')
      .attr('width', 400)
      .attr('height', 300)

    this.svg
      .selectAll('rect')
      .data(this.values)
      .enter()
      ...

Now we can access the data and the visualization from anywhere in the Vue Component. Let us add a watcher that will track the values and update the visualization

export default {
  ...
  watch: {
    values() {
      // Bind the new values array to the rectangles
      const bars = this.svg.selectAll('rect').data(this.values)

      // Remove any extra bars that might be there
      // We will use D3's exit() selection for that
      bars.exit().remove()

      // Add any extra bars that we might need
      // We will use D3's enter() selection for that
      bars
       .enter()
       .append('rect')
       .attr('x', function(d, i) {
         return i * 50
       })
       .attr('y', 10)
       .attr('width', 25)
       .attr('fill', 'steelblue')
       // Let us set the height for both existing and new bars
       .merge(bars)
       .attr('height', function(d) {
         return d * 50
       })

    }
  }
}

There we have it – a visualization that will update based on the user’s interaction.

Updating_D3_with_Vue

Notes

  1. If we compare this technique to the previous one, it does seem like we are writing more verbose JavaScript than necessary. But if you had written D3 at all, you would find this verbose JS better to manage than the previous one.
  2. Performance – One concern when switching from Vue’s direct component reactivity to DOM based updates using D3 is the performance. I don’t have a clear picture on that matter. But the good thing is, D3’s update mechanism changes only what is necessary similar to that of Vue’s update mechanism. So I don’t think we will be very far when it comes to performance.
  3. One important advantage of this method is we can make using the animation capabilities that comes with D3js